
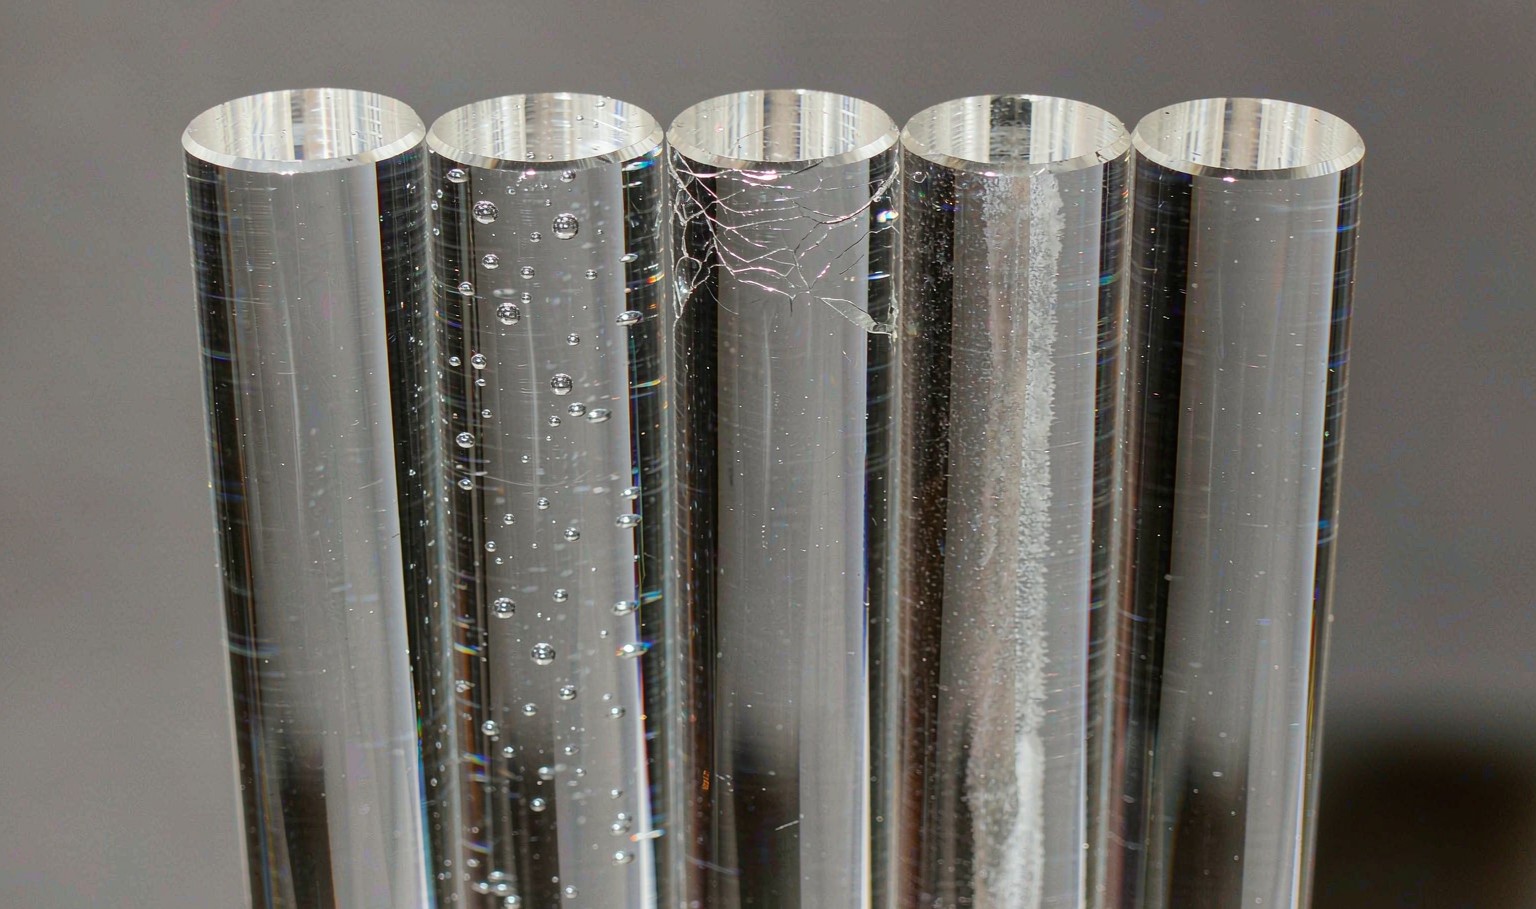
- 1. 1. Read the rod end first
- 2. 2. Bubbles
- 3. 3. Central void and shrinkage cavity
- 4. 4. Haze and milkiness
- 5. 5. Crazing
- 6. 6. Cracking after machining
- 7. 7. Colour streaks
- 8. 8. Diameter variation
- 9. 9. Ovality
- 10. 10. Bend and bow
- 11. 11. Yellowing
- 12. 12. Surface scratches and polish marks
- 13. 13. Chipped or cloudy ends
- 14. 14. The troubleshooting matrix
- 15. 15. Frequently asked questions
- 16. Send us the defect and the diameter
On this page
1. Read the rod end first
Acrylic rod is transparent, which makes it the easiest plastic product in the world to inspect — and the hardest to inspect quickly. Three observations narrow almost any defect to a cause before anything is measured.
- Look through the rod end, not at the surface. Most real defects are internal: bubbles, voids, haze, flow lines. Surface scratches are the least important and the most complained about.
- Look along the length against a dark background, then against a light background. Bubbles show up against dark. Haze and streaks show up against light. A defect visible in only one condition tells you what it is.
- Measure the diameter at three points along the length. If the diameter varies, the defect is process stability, and everything else you observe may be a consequence of it.
One question separates two completely different problems: did the defect arrive in the rod, or did it appear after machining? Rod defects are the producer's responsibility. Defects that appear after drilling or cementing are usually a stress and annealing issue, and the fix is upstream of the machining step.
2. Bubbles
Round voids inside the material, visible when you look through the rod. They are the defining defect of acrylic rod and the first thing any buyer inspects for.
Four origins, four different appearances.
| Type | Uiterlijk | Oorzaak |
|---|---|---|
| Air entrainment | Few, large, irregular; often near the surface or clustered on one side | Air trapped during mould filling in casting, or drawn in at the feed throat in extrusion |
| Monomer boil | Many small bubbles concentrated toward the centre of a thick section | The exotherm ran away — cure too fast or too hot for the diameter |
| Moisture | Very fine, evenly spread, with an overall haze | Wet pellets in extrusion; water or contamination in the monomer in casting |
| Degassing | Small bubbles clustered near the end of a cast rod | Insufficient vacuum or hold time before the monomer gels |
Fixes. For air entrainment: fill from the bottom, slow the fill, and check the extruder feed throat temperature so the pellets are not sticking and starving the screw. For monomer boil: slow the temperature ramp, lower the peak, lengthen the hold — the cure programme is the control. For moisture: dry the pellets properly and verify the dryer's dew point rather than trusting the setting. For degassing: increase the vacuum hold before filling.
The commercial question. Bubbles are only a defect if they are where you can see them. For a machined component where the centre will be bored out, small central bubbles are irrelevant. For a visible rod used as a design element, they are fatal. State where bubbles are unacceptable rather than demanding a bubble-free rod at any cost.
3. Central void and shrinkage cavity
An elongated void or a stringy cavity running down the centre of a thick rod. Often mistaken for a large bubble, but it has a different cause and a different status.
Cause. Shrinkage. As the polymer cools and converts, the outside solidifies first and the centre continues to contract. If there is no material available to feed that contraction, the centre pulls apart. In very thick cast sections the effect is unavoidable in principle, and it is a process characteristic rather than a manufacturing error.
Fixes. A slower, longer cure reduces it but does not eliminate it at large diameters. For a part that must be free of a central void, the options are to specify a smaller diameter, to specify that the centre will be machined out, or to accept the void as a documented characteristic with a defined maximum size.
What to agree in the specification. If you need large-diameter solid rod, agree the maximum acceptable central void in writing before the order, with a reference sample. Discovering it at goods-in creates a dispute where both sides are technically right.
4. Haze and milkiness
The rod is not clear — it has an overall milky or foggy appearance rather than a sharp internal defect. In coloured rod it shows as a loss of depth and saturation.
Causes. Moisture in the pellets, by far the most common. Incomplete polymerisation in cast rod, leaving residual monomer that scatters light. Contamination — dust, oil, a different polymer in the regrind stream. Undispersed pigment at high loading. Surface haze from a rough polish, which is distinguishable because it disappears when the rod is wetted.
Fixes. Verify the drying cycle with an actual dew-point reading. Check the cast cure schedule and the initiator level. Segregate regrind by material and colour. Reduce pigment loading if it is the cause, and adjust the shade with a stronger pigment instead of more of a weak one.
The quick test. Wipe a drop of water on the surface. If the haze disappears under the drop, it is a surface polish problem. If it remains, it is internal.
5. Crazing
Fine silvery cracks, usually running perpendicular to a machined edge or radiating from a hole, visible as a network of shiny lines. Crazing is not a crack yet — it is a layer of micro-voids — but it is the precursor to one.
Causes. Internal stress plus a stress-crazing agent. The stress comes from casting, extrusion or machining. The agent is often a solvent: a cement, a cleaning fluid, a release agent, an adhesive, even a packaging film's plasticiser. Heat and sustained load also craze acrylic without any solvent.
Fixes. Anneal the rod before machining. Use sharp tooling with a slow feed to minimise machining stress. Avoid solvent-based cleaners — use a mild detergent and water. Specify solvent-free adhesives where possible. And if the part will be in contact with a solvent by design, specify cast rod, which resists crazing better than extruded.
The test worth asking for. A craze test — immersing a sample in a stress-crazing agent for a specified time and checking for crazing — is a five-minute test that catches an inadequate annealing cycle before it becomes a field failure.
6. Cracking after machining
The part is sound when it leaves the machine and cracks hours or days later, usually from a drilled hole, a tapped thread or a sawn edge.
Causes. Residual stress released by material removal. A sharp internal corner acting as a stress concentrator. A dull drill or excessive feed generating local heating and stress. Solvent cement applied to an unannealed edge. Over-tightened fasteners or an interference fit.
Fixes. Anneal before machining — this is the single most effective measure. Use a drill with a shallow point angle and a slow feed, back the workpiece to prevent breakout, and clear chips rather than letting them pack. Radius internal corners. Avoid interference fits; acrylic has a low modulus and does not tolerate hoop stress.
7. Colour streaks
Swirling or directional bands of stronger and weaker colour, or a milky streak where the pigment is missing.
Causes. Undispersed pigment clusters. Insufficient mixing in the extruder screw, usually from low back pressure or low melt temperature. A masterbatch that is too coarse for the section. In casting, insufficient agitation of the monomer before filling, or pigment settling in the tank.
Fixes. Improve the pre-dispersion and use a finer masterbatch. Raise back pressure and melt temperature to improve mixing. In casting, agitate continuously and fill promptly. If the streak is milky rather than darker, the pigment is absent rather than concentrated, which points at a dispersion or a feeder problem rather than a loading problem.
8. Diameter variation
The rod measures differently at different points, or measures outside the drawing tolerance. On transparent rod this is easy to miss because there is no surface texture to draw the eye.
Causes — extruded. Haul-off speed drifting against extruder output, which changes drawdown. Melt temperature or pressure variation changing the swell at the die. Die wear. A worn or slipping haul-off belt. In-line gauge drift.
Causes — cast. Mould tube wear or ovality. Inconsistent fill level. Uneven cooling around the tube, which makes the rod shrink unevenly. Insufficient cure, so the rod is still shrinking when it is measured.
Fixes. For extruded rod, check the haul-off and the drawdown ratio first, then the die. For cast rod, check the tube for wear and measure the rod after full cooling, not immediately after demoulding. Cast rod cannot be brought to extruded tolerance — if the drawing needs ±0.2 mm, the process has to change, not the settings.
9. Ovality
The cross-section is elliptical rather than circular — the diameter measured across one axis is different from the diameter at 90°.
Causes. Uneven cooling around the circumference, so one side contracts more than the other. In extrusion, a die that is not concentric with the cooling, or a haul-off that is pulling to one side. In casting, a tube that is out of round, or a rod resting on a flat surface while still soft.
Fixes. Balance the cooling around the circumference. Check die concentricity and the alignment of the haul-off. For cast rod, ensure the tubes are round and that rods are supported evenly during cooling and storage.
How to specify it. Ovality is normally expressed as a percentage of nominal diameter — 1 to 2 % for extruded, up to 3 % for cast. A drawing that specifies only diameter, without ovality, does not actually define a round rod.
10. Bend and bow
The rod is not straight. For a long length this is often more objectionable than a diameter error, because it is visible immediately.
Causes. Uneven cooling, so one side contracts before the other. Residual stress from extrusion orientation relaxing over time. Stacking or storing rods unsupported while they are still warm. In casting, a tube that is not vertical during cure.
Fixes. Balance cooling. Allow the rod to cool fully before cutting and packing. Store on a flat, supported surface rather than leaning against a wall. For long lengths, specify straightness in millimetres per metre rather than "straight".
11. Yellowing
A warm or brown cast that should not be there. In clear rod it is immediately obvious; in coloured rod it shifts the hue.
Causes. Thermal degradation during processing — an overheated extruder, excessive residence time, or a cast cure that ran too hot. UV exposure in service, which affects the polymer surface and the colorant differently. Contamination with a degraded batch of regrind. Some initiator residues in cast rod.
Fixes. Lower the melt temperature and reduce residence time. Use a UV-stabilised grade for outdoor parts. Segregate regrind and limit its proportion. If yellowing appears only after time in service, it is a UV issue and the material has to change — no process adjustment will reverse it.
12. Surface scratches and polish marks
Scratches, polishing swirls, or a dull band on the surface. Cosmetic rather than structural, but on a decorative rod it is the defect that causes rejection.
Causes. Handling without protection between cutting and packing. Rods packed in contact with each other without an interleaf. A polishing operation that used too coarse a compound or too much pressure, leaving swirl marks. A protective film that was applied over contamination.
Fixes. Interleave rods in packing, use a peelable protective film on optical grades, and finish with a progressively finer polish rather than a single aggressive pass. For flame-polished ends, control the flame and the dwell — overheating produces a faint orange-peel surface.
13. Chipped or cloudy ends
Broken or rough edges at the cut, or an end that looks cloudy rather than clear.
Causes. A dull saw blade, or a blade with the wrong tooth geometry for acrylic. Cutting too fast, which melts rather than cuts. Insufficient support at the exit side, causing breakout. A cloudy end is usually a sawn end that was never machined or polished — saw marks scatter light.
Fixes. Use a blade designed for acrylic with a high tooth count and a slow feed, support the exit side, and specify whether the end needs to be machined square, polished, or simply sawn. For an optical part where light must enter through the end face, a polished end is a separate operation and a separate line item.
14. The troubleshooting matrix
| Defect | Material & colour prep | Process (cure or extrusion) | Mould, die & cooling | Handling & finishing |
|---|---|---|---|---|
| Bubbles | Moisture, contamination | Cure ramp, vacuum, melt temp | Fill method, feed throat | — |
| Central void | — | Cure speed for the diameter | Section size | — |
| Haze | Wet pellets, pigment loading | Incomplete polymerisation | — | Rough polish (surface only) |
| Crazing | — | Inadequate annealing | — | Solvent contact, machining stress |
| Cracking | — | Residual stress | — | Dull tooling, sharp corners, interference fits |
| Colour streaks | Dispersion quality | Mixing, back pressure | — | — |
| Diameter variation | — | Haul-off, melt stability | Die wear, tube wear, cooling balance | Measuring too early after demould |
| Ovality | — | — | Cooling imbalance, die concentricity, tube roundness | Resting while soft |
| Bend | — | Stress relaxation | Cooling balance, tube verticality | Unsupported storage while warm |
| Yellowing | Degraded regrind, colorant | Overheating, residence time | — | UV exposure in service |
| Scratches | — | — | — | Packing, interleaving, polish sequence |
| Chipped ends | — | Cut speed | — | Blade choice, exit support |
Read across, not down. Defects with a plausible cause in only one column are usually that cause — and note how many land in the last two columns, which are the ones most often outside the producer's control once the rod has shipped.
15. Frequently asked questions
Are bubbles in acrylic rod always a defect?
No. In large-diameter solid rod a small central void is a normal characteristic of the casting process. Small bubbles in an area that will be machined away are also irrelevant. What matters is where they are and whether they are visible in the finished part — so the specification should define that, not demand a bubble-free rod unconditionally.
Why did my acrylic rod crack a day after drilling?
Residual stress released by material removal, concentrated at the sharp edge of the hole. The fix is to anneal the rod before machining, use a sharp drill with a shallow point angle and slow feed, and avoid solvent contact on the freshly machined edge.
What causes a milky streak inside an otherwise clear rod?
Undispersed pigment, or a region where the pigment is missing altogether. It is a dispersion fault rather than a colour fault — the pigment is present in the batch but not evenly distributed. Improving the pre-dispersion, or raising back pressure and melt temperature in extrusion, is the fix.
Can haze in acrylic rod be polished out?
Only if it is on the surface. Wipe a drop of water on the rod: if the haze disappears under the drop, it is a surface polish problem and can be corrected. If it remains, it is internal — usually moisture or incomplete polymerisation — and no amount of polishing will remove it.
How straight should acrylic rod be?
Extruded rod typically holds 1 to 2 mm of bow per metre; cast rod 2 to 5 mm per metre. Specify straightness in millimetres per metre and state the length over which it is measured, because a rod that is straight over 500 mm can be visibly bowed over 2 metres.
Why does clear acrylic rod turn yellow?
Either thermal degradation during processing or UV exposure in service. Process-induced yellowing is uniform and present immediately; UV yellowing develops over months and is usually worse on the side facing the light. Only the second is fixed by changing to a UV-stabilised grade — and by then the affected parts cannot be recovered.
Send us the defect and the diameter
Photograph the rod end against both a dark and a light background, tell us the diameter and whether the defect appeared before or after machining. We will tell you the likely cause and whether it is a process fix, a material change, or something your drawing is asking the process to do that it cannot.






 NL
 EN
 ES
 FR
 DE
 PT
 AR
 RU
 JA
 KO
 IT
 TR
 PL
 ID
