

Why order matters
A first shot produces a part with flash, short shots, sink marks, a dimension that is out and an ejector mark. Every one of them can be attacked with a process change, and every process change affects more than one defect. Raising the pack pressure fixes the sink and makes the flash worse; lowering the melt temperature fixes the flash and creates a weld line.
That coupling is why a tryout without an order takes six rounds. Each round fixes one defect and creates another, and the process wanders around a solution it never reaches. The alternative is to rank the defects by how much of the part they affect and to fix them in that order, accepting that the lower ones may change.
The ranking is not by severity. A cosmetic defect on a hidden face is not urgent; a dimensional error that changes the tool is urgent even if it is small. The ranking is by how much of the remaining work depends on it, and the tool-related defects always come first because the tool is the thing that is hardest to change later.
There is a second reason to work in order. A tryout is a series of experiments, and an experiment is only informative if one thing changes at a time. Fixing three defects at once produces a part that is better and a process that nobody understands, and the understanding is what the production team needs.
Fix the tool before the process
Flash is the clearest example. Flash comes from a gap, and a gap comes from a parting line that does not close, a slide that does not seat, or insufficient clamp force for the projected area. Two of those are tool problems and one is a machine problem, and no amount of process tuning fixes a parting line that does not fit.
The test is simple: reduce the injection pressure and see whether the flash goes away. If it does, the flash is a process problem and the clamp or the pack pressure is the cause. If it stays, the tool has a gap and the tool has to come out.
The same logic applies to short shots. A short shot can come from low pressure, low temperature, a blocked gate or a vent that cannot displace the air. The distinguishing test is to raise the pressure: a part that fills at higher pressure was under-filled, and a part that still will not fill has a flow restriction that the process cannot overcome.
Doing this first is what shortens the tryout. A tool problem found in the first hour can be fixed on the bench while the machine is still warm; the same problem found in round four costs a day and a re-schedule. The order is not about being thorough, it is about being early.
The ranking method
The chart on the left plots open defects against tryout round for two ways of working. Both start with 24 defects. Ranked debugging goes 10, 4, 2, 1, 0 and reaches zero at round six. Fixing whatever is loudest goes 21, 18, 14, 11, 9 and is still at nine defects at round six.
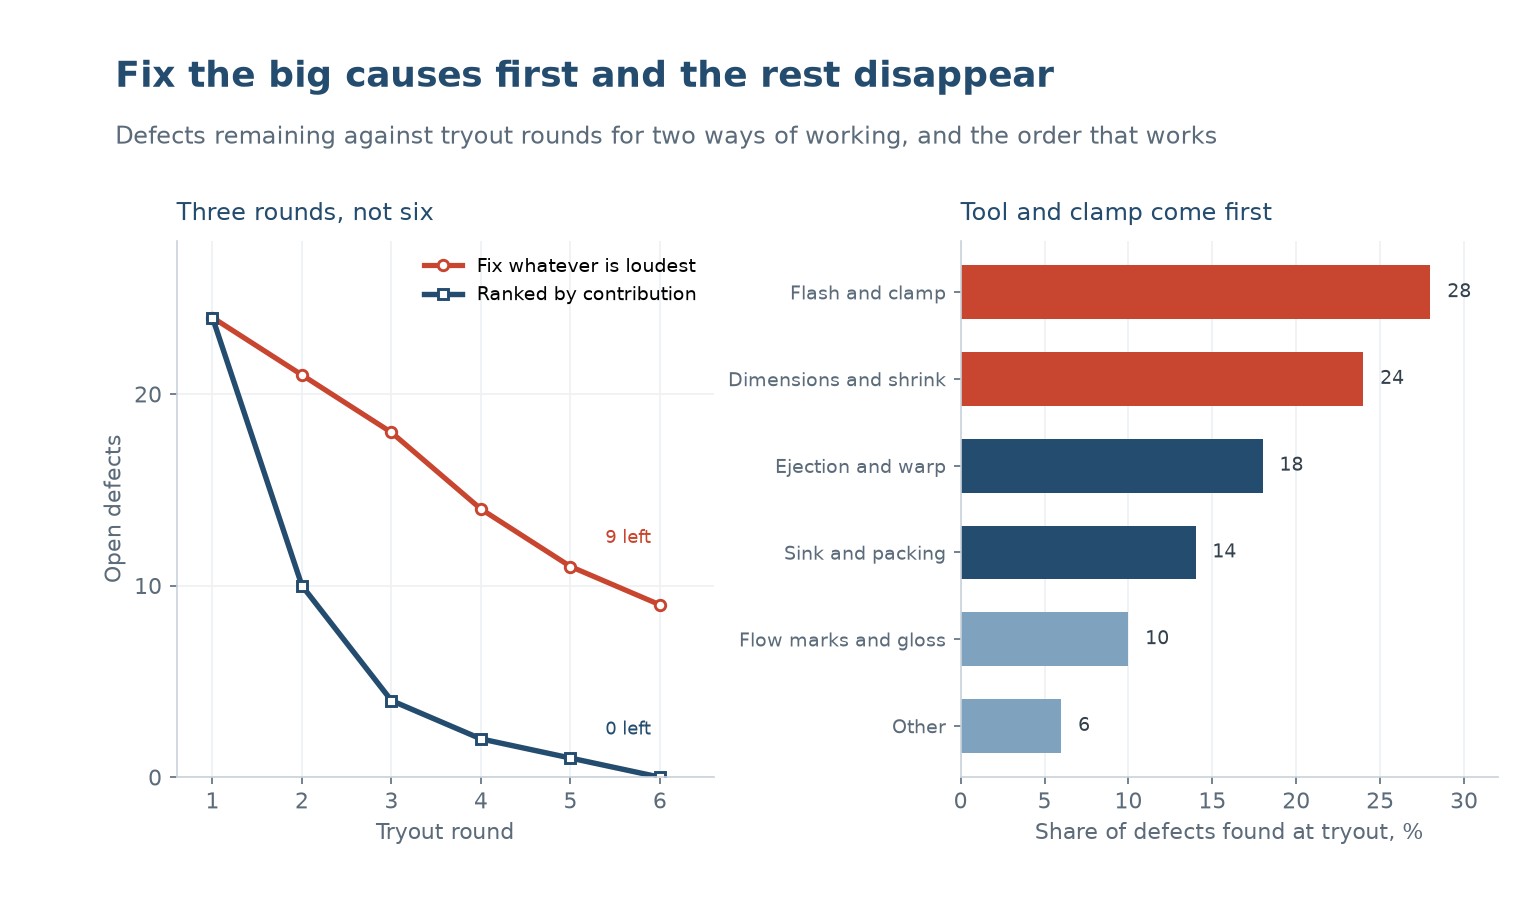
The shape of the ranked curve is the argument. Half the defects disappear in the first round, because the biggest contributor is usually a single cause with several symptoms. The ad hoc curve is almost linear, because each round removes one symptom and the cause stays.
The ranking itself is a table with three columns: defect, share of the part affected, and whether it can be fixed in the tool or in the process. Sorting by the first and filtering by the third gives the order. It takes twenty minutes at the bench and it is the difference between three rounds and six.
There is a temptation to rank by how easy a defect is to fix. That produces quick wins and a long tail, because the hard defects are usually the ones with the largest contribution. The order has to be by contribution, and the easy ones get fixed on the way.
Flash, clamp and the first hour
The chart on the right shows where tryout defects concentrate. Flash and clamp account for 28 percent, dimensions and shrink for 24, ejection and warp for 18, sink and packing for 14, flow marks and gloss for 10, and everything else for 6. The first two categories are 52 percent of the work and both are tool-related.
The first hour of a tryout should therefore be spent on the tool, not on the process. Check that the parting line is clean and closes on blue, that every slide seats fully, that the ejector plate returns without binding and that the water circuits flow. Those four checks take an hour and they remove the majority of the defects that would otherwise be blamed on the process.
Clamp force is the one machine setting that belongs in this phase, because it interacts with the tool. A tool that needs more clamp than the machine can deliver will flash no matter what the process does, and a tool that is over-clamped will wear its parting line. Calculate the projected area times the cavity pressure and compare it with the machine rating before the first shot.
Venting belongs here too. A tool with no vent cannot fill a fast cavity, and the symptom is a burn or a short shot that looks like a process problem. A 0.02 mm vent at the last point to fill costs nothing to add and removes a class of defects that no process change can fix.
Dimensions, shrink and the second pass
Once the tool closes and fills, the next pass is dimensional. Measure the first article fully, compare it with the drawing, and separate the dimensions that are uniformly off from the ones that vary. A uniform offset is a shrink difference and can often be corrected in the tool; a varying dimension is a process or a cooling problem.
Shrink is not a single number. It varies with wall thickness, with gate position, with mould temperature and with pack pressure, and the variation across a part is usually larger than the tolerance. That is why a dimensional correction has to be based on a part made at the intended process, not on the first shot.
The second pass is also where the process window is established. Once the tool is known to be sound, the process is varied deliberately: melt temperature up and down, pack pressure up and down, cooling time up and down, and the part measured at each corner. The window is the region where the part is in specification, and a tryout that does not produce a window has not finished.
Recording the window is the deliverable. A process sheet with one set of numbers is a recipe that will drift; a window with limits is a specification that a setter can work inside. The difference shows up six months later when a new shift runs the tool.
| Pass | What is checked | Typical duration |
|---|---|---|
| One: tool | Parting line, slides, ejection, water, venting | First hour |
| Two: fill | Short shots, flash, burn, weld lines | Second hour |
| Three: dimensions | First article against drawing, shrink | Half a day |
| Four: window | Melt, pack, cooling varied to limits | Half a day |
| Five: cosmetic | Gloss, texture, flow marks, colour | Last |
Table 1 — The five passes of a tryout
When to stop adjusting
There is a point in every tryout where the process is being asked to compensate for the tool. The symptom is a setting at the end of its range: pack pressure at maximum, melt temperature twenty degrees above the recommended band, cooling time doubled. Those settings produce a part and they produce it slowly and unreliably.
The rule is that a process which needs more than about a third of its available range to make a good part is a process that will not repeat. A pack pressure at 80 percent of the machine maximum has no room for the next batch of resin, and the next batch will not run.
The second stop signal is a defect that changes with time. A part that is good at shot ten and bad at shot fifty has a thermal problem, and the answer is a cooling change in the tool rather than a process adjustment. Chasing it with the process produces a setting that works for the first hour of every shift.
The third is a dimension that moves between the first and the hundredth shot. That is shrinkage settling, and it is normal to a point. If it is still moving after a hundred shots the tool is too hot or the cooling is unbalanced, and neither is fixed at the control panel.
| Symptom | Points at the tool | Points at the process |
|---|---|---|
| Flash that survives low pressure | Parting line or slide gap | Clamp force, pack pressure |
| Short shot that survives high pressure | Gate, runner, vent | Melt temperature, speed |
| Burn at the last point to fill | Missing vent | Injection speed |
| Sink that survives high pack | Rib or boss too thick | Pack time, gate freeze |
| Warp that changes with time | Cooling imbalance | Mould temperature |
| Ejector marks | Ejector area too small | Ejection speed, demould temperature |
Table 2 — Reading a defect as tool or process
How many tryout rounds should a mould need?
Three for a well-built tool on a known material. Six rounds usually means the defects were fixed in the wrong order rather than that the tool is bad.
Should I fix flash with clamp force or with the tool?
Test first. If the flash disappears at lower injection pressure it is a process problem; if it stays, the tool has a gap at the parting line or a slide that does not seat.
Why does my tryout keep finding new defects?
Because the changes are coupling. Fixing one defect with a process change creates another. Rank by contribution, change one thing at a time, and record what each change did.
When should I stop adjusting the process?
When a setting is at the end of its range, or when a defect changes with time. Both mean the tool is being asked to compensate for something it cannot fix.
What is a process window and why does it matter?
The range of melt, pack and cooling settings that produce an in-specification part. A single set of numbers drifts; a window is what lets a different shift run the same tool.
How long should a tryout take?
One day for a straightforward tool: an hour on the tool, an hour on fill, half a day on dimensions and half a day establishing the window. Anything longer is usually a tool issue.
A tool that needs six rounds to make a good part?
Send the defect list and the process sheet from the last tryout. We will tell you which defects are tool-related and in what order to attack them.




 KO
 EN
 ES
 FR
 DE
 PT
 AR
 RU
 JA
 IT
 NL
 TR
 PL
 ID
