Splash-shaped silver marks and fine bubbles in PC sheet point to moisture that hydrolysed the melt rather than to a die or filtration fault.
What the failure looks like on the line
Polycarbonate profiles are bought for impact resistance and light transmission, both of which are sensitive to drying and melt history.
Extruded PC sheet shows pale, feather-like silver streaks aligned with the machine direction and, in thicker gauges, scattered micro-voids visible against a backlight. The marks come and go between lots and are worst shortly after a dryer start-up.
PC is hygroscopic; residual moisture flashes to steam at melt temperature and hydrolyses the carbonate linkage, lowering molar mass locally. The vapour is stretched into silvery splay at the die exit, while the degraded, gas-rich regions leave micro-voids. Drying to a low dew-point and limiting residence time address the cause; raising melt temperature only makes the hydrolysis faster.
Most of these complaints arrive after the parts have been accepted, which is a sign that the acceptance test measured the wrong thing. On a buyer's specification this distinction matters: a part can measure inside tolerance and still fail in use, because the drawing records geometry while the complaint records behaviour. Resin moisture before extrusion is usually the first value both sides compare, and it is also the one most often quoted without the conditions attached to it.
The process window that decides it
Four variables move this result more than the rest. The ranges below are illustrative engineering guidance for a first discussion; confirm them on your own tool, material grade and part geometry before they become contract terms.
| Variable | Typical window | What fails outside it |
|---|---|---|
| Resin moisture before extrusion | < 0.02 % w/w | Above the limit splay and molar-mass loss appear in the melt |
| Dryer dew point | -30 to -40 C | A warmer dew point cannot pull the bound moisture down to target |
| Drying time at temperature | 3-6 h at 110-120 C | Short dwell leaves the centre of the pellet undried |
| Melt residence time | 3-8 min | Long residence at high temperature compounds hydrolytic degradation |
Table 1. Starting window for a joint process trial. Values are engineering guidance, not a measured survey.
Resin moisture before extrusion is typically held at < 0.02 % w/w. Above the limit splay and molar-mass loss appear in the melt Record it together with the measurement point and the moment in the cycle; a single number without a location is not a process setting.
Dryer dew point is typically held at -30 to -40 C. A warmer dew point cannot pull the bound moisture down to target When this drifts, the symptom usually appears at one cavity, one sheet position or one lane before it appears across the whole batch.
Drying time at temperature is typically held at 3-6 h at 110-120 C. Short dwell leaves the centre of the pellet undried A change here is cheap during a trial and expensive after tooling release, so treat it as a controlled variable with a documented re-approval.
Melt residence time is typically held at 3-8 min. Long residence at high temperature compounds hydrolytic degradation Put it on the change-control list, otherwise an unannounced material or setting substitution will be mistaken for ordinary process noise.
Reading the response curve
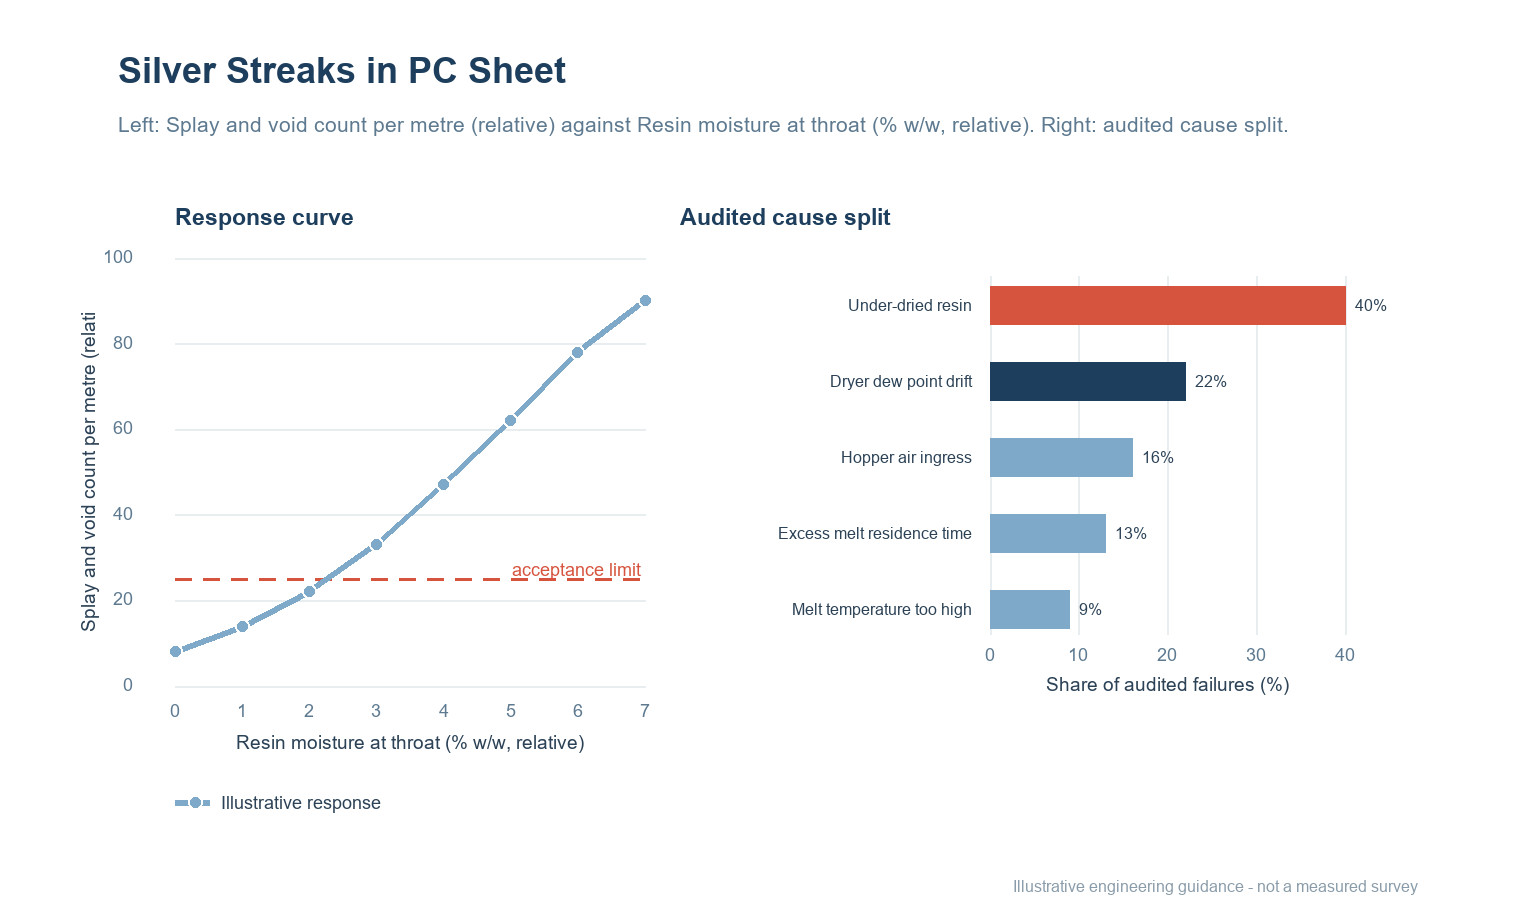
The left panel shows splay and void count per metre (relative) as resin moisture at throat (% w/w, relative) increases: the response rises from 8 to 90 on the illustrative 0–100 scale. The dashed line at 25 marks a proposed acceptance limit, not a universal standard. Move that line only after the test method and the sample plan have been agreed, otherwise two suppliers can both be compliant and still deliver different parts.
Read the shape rather than a single point. A curve that changes quickly near the limit is more sensitive to ordinary process noise than one that approaches it gradually, and that difference should be reflected in how tightly the setting is controlled and how often it is checked.
Where the causes actually sit
The right panel of Figure 1 splits audited failures of this type into five groups. The percentages are illustrative engineering guidance for prioritising an investigation, not a measured survey and not a prediction for your line.
| Cause | Illustrative share | First check |
|---|---|---|
| Under-dried resin | 40% | Measure pellet moisture at the extruder throat, not only at the dryer outlet. |
| Dryer dew point drift | 22% | Log dryer dew point and return-air temperature across the whole shift. |
| Hopper air ingress | 16% | Check the hopper lid and conveying line for ambient-air leaks. |
| Excess melt residence time | 13% | Compare a freshly dried lot against a lot held overnight in the hopper. |
| Melt temperature too high | 9% | Re-run the suspect material after a full re-dry before adjusting the die. |
Table 2. Cause split and the corresponding first check. Shares are indicative and sum to 100.
Under-dried resin accounts for roughly 40% of the illustrative split. Measure pellet moisture at the extruder throat, not only at the dryer outlet. Start here before authorising a material or tooling change, because it is the fastest explanation to confirm or eliminate.
Dryer dew point drift accounts for roughly 22% of the illustrative split. Log dryer dew point and return-air temperature across the whole shift. Start here before authorising a material or tooling change, because it is the fastest explanation to confirm or eliminate.
Hopper air ingress accounts for roughly 16% of the illustrative split. Check the hopper lid and conveying line for ambient-air leaks. Start here before authorising a material or tooling change, because it is the fastest explanation to confirm or eliminate.
Checks before sign-off
The order matters because each step removes a class of explanation before the next one is opened.
- Measure pellet moisture at the extruder throat, not only at the dryer outlet.
- Log dryer dew point and return-air temperature across the whole shift.
- Check the hopper lid and conveying line for ambient-air leaks.
- Compare a freshly dried lot against a lot held overnight in the hopper.
- Re-run the suspect material after a full re-dry before adjusting the die.
Keep a retained reference sample beside every result. When a batch is disputed, the comparison that settles it is almost always between the retained part and the current one under the same method, not between either part and a number on a drawing. Record the instrument, the operator, the conditioning time and the position on the part or sheet for each reading.
Writing it into the specification and the evidence pack
Sheet shall show no visible splay or micro-voids above the agreed limit sample when inspected against a backlight, with resin moisture recorded below the stated limit at the extruder throat.
Write the requirement as a behaviour at a stated condition, not as a brand of material or a machine setting. State the test method, the conditioning, the sample plan and the rule for deciding a pass. Where a document is needed, ask the supplier for documentation that covers the actual construction and check its scope against your own market before approval; a document for the base material alone does not describe the finished part you are buying.
At first-article approval, freeze the drawing revision, the material and colour identification, the process window, the tool and cavity identification, and the inspection method. Any later change to grade, site, tool, or window should trigger a new first article rather than a paper waiver. Keep retained samples from the approved lot and from each production lot so that a future comparison is possible.
| Evidence item | What it must show |
|---|---|
| Approved drawing and revision | The exact geometry and tolerances the decision applies to |
| Material and colour identification | Grade, supplier, colour reference and any declared recycled content |
| Process window and change log | The agreed settings and any deviation since approval |
| Inspection record and retained samples | Method, conditions, results and a physical reference from the same lot |
Table 3. Minimum evidence pack for a first-article decision and a later batch dispute.
All ranges in this article are illustrative engineering guidance rather than measured data. Treat them as a starting agenda for a process trial, not as a certificate for a batch that has not been run.
Questions buyers ask
Is this a material problem or a process problem?
PC is hygroscopic; residual moisture flashes to steam at melt temperature and hydrolyses the carbonate linkage, lowering molar mass locally. The vapour is stretched into silvery splay at the die exit, while the degraded, gas-rich regions leave micro-voids. Drying to a low dew-point and limiting residence time address the cause; raising melt temperature only makes the hydrolysis faster. It is worth separating the two before a supplier changes a grade: hold the material constant for one controlled run, then move one setting at a time. If the symptom follows the setting, the material was never the cause.
Can resin moisture before extrusion be traded against cycle time?
Only within the window stated in Table 1, and only with a recorded trial. Above the limit splay and molar-mass loss appear in the melt A faster cycle that sits outside the window usually moves the failure downstream, where it costs more to find.
What should be recorded at incoming inspection?
Keep the measurement, the method, the sample identity and the conditions together. Measure pellet moisture at the extruder throat, not only at the dryer outlet. A result without its conditions cannot be compared with a later batch.
Does a change of PC require re-approval?
Treat any change to material grade, tool, site or process window as a change that needs a new first-article decision. For profile extrusion work the drawing alone is not enough; the process route is part of what was approved.
How many samples are enough for a first-article decision?
There is no universal number. Sample across cavities, lanes, sheet positions or reel lengths so that the spread is visible, not just the average. Agree the sample plan and the acceptance rule with the supplier before the trial starts.
What belongs in the evidence pack?
The approved drawing and revision, the material and colour identification, the process window, the inspection method and results, the retained reference samples, and documentation covering the actual construction. Ask the supplier to state the scope of each document and check it against your own market.
Seeing this on a current profile extrusion job?
Send the drawing, the material and grade, the process window you are running, and the point in the cycle or the shelf life where the fault appears. We will help you separate a material question from a process question and a specification question before anyone changes a tool.
Continue reading
- Plastic Drying Before Extrusion: Hygroscopic vs Non-Hygroscopic Resins
- Drying Before Extrusion: Hours Are Not a Specification
- Bubbles and Voids in Extrudate: Moisture, Air and Decomposition
- Polycarbonate Sheet: It Punishes Heat Twice
- What Are the Most Common Defects in Plastic Extrusions and How to Spot Them?

 EN
 ES
 FR
 DE
 PT
 AR
 RU
 JA
 KO
 IT
 NL
 TR
 PL
 ID