The problem
Symptom. A panel that looks flat as moulded shows a clear shadow of every rib after the 120 C paint bake and high-gloss topcoat, so a passing first article becomes a rejected Class-A surface.
What it costs. The fault is found only after painting, the most expensive step, so whole batches are scrapped or reworked while moulder and painter argue over which inspection condition applies.
This guide links the rib-to-wall ratio to measured sink depth before and after coating, and defines a painted-part acceptance limit to agree before tooling.
Why a rib shadow appears only after coating
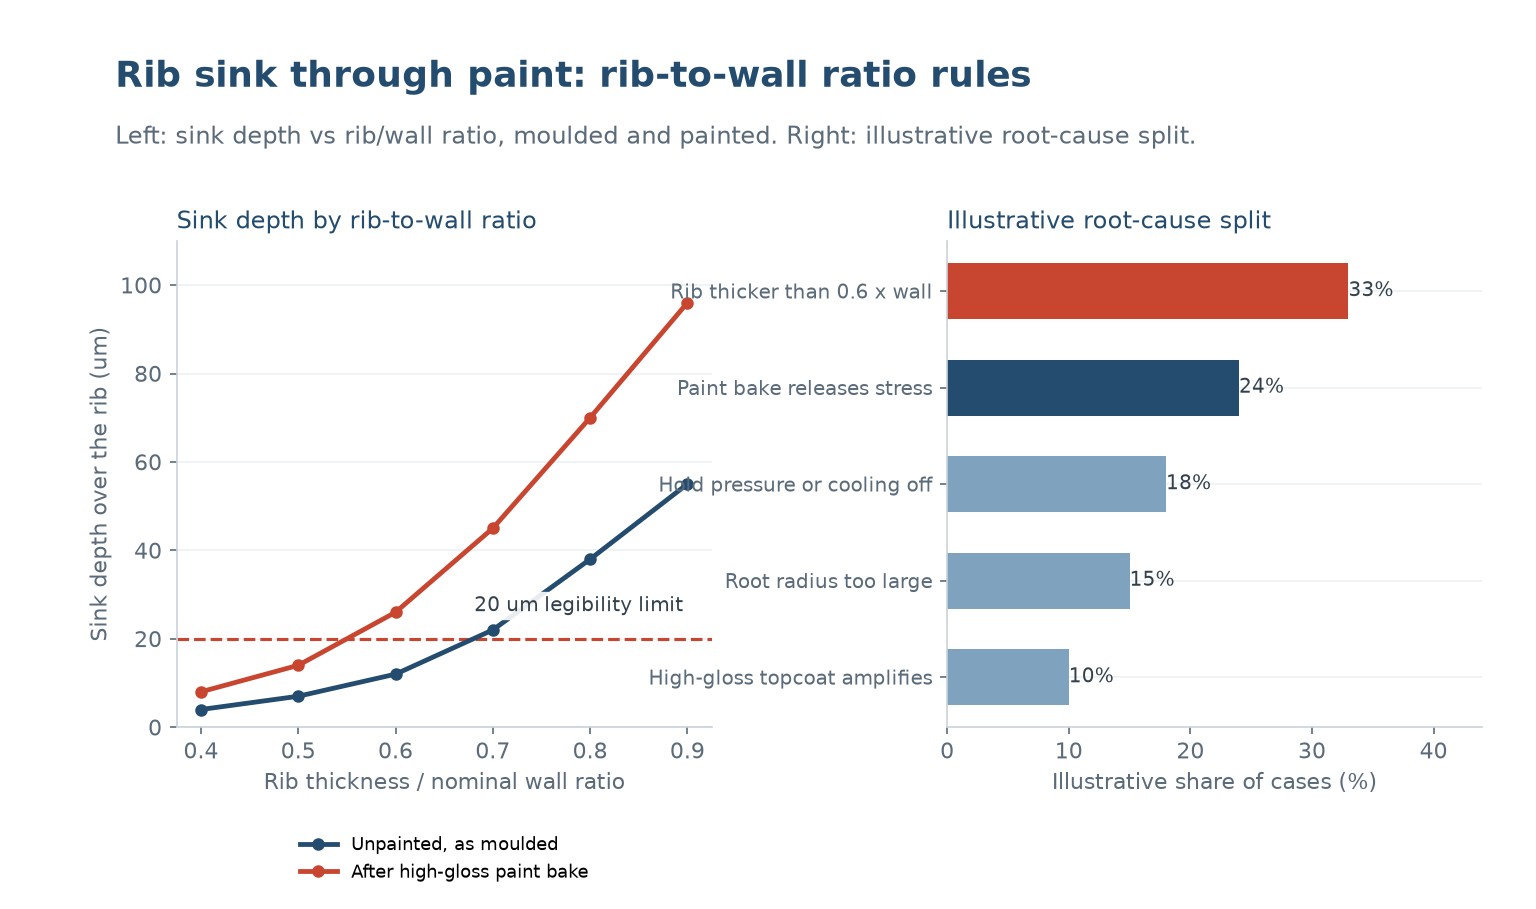
A rib at 0.8 times the nominal wall leaves a 38 um sink that is invisible as moulded, yet a 120 C paint bake and high-gloss topcoat roughly double it to a legible shadow on the finished panel.
| Observed symptom | Most likely cause | First check on the line |
|---|---|---|
| Faint rib line only after painting | Sink telegraphing through the coating | Profile unpainted and painted panels from one shot |
| Shadow matches every rib exactly | Rib-to-wall ratio too high | Measure rib and wall thickness on section |
| Depth grows after the bake | Stress release at 120 C | Measure before and after the paint oven |
| Only one rib reads through | Local cooling or a long unsupported rib | Log the rib position against the cooling layout |
Table 1 - Reading the shadow before re-cutting the rib
Need a fixed price for this moulded part?
Send the 2D drawing, resin grade and annual volume. Our engineers return a DFM review, a material recommendation and a written quotation you can compare line by line.
Measure sink on unpainted and painted panels
Profile the sink across the rib with a profilometer on unpainted and painted panels from one shot. A jump from 12 to 26 um at a 0.6 ratio is telegraphing, not a new dent.
A five-step diagnostic sequence
- Profile the rib on unpainted and painted panels from one shot.
A doubling of depth after coating confirms telegraphing rather than handling damage. - Section the part and measure rib against wall.
A ratio above 0.6 on a 2.5 mm wall is the design root cause. - Record hold pressure, mould temperature and cooling.
A 45 MPa pack at 90 C leaves more root shrink than 60 MPa at 70 C. - Compare against the 20 um legibility limit.
Define the gloss and viewing distance so a borderline panel is measurable. - Thin the rib in the tool, then re-paint and re-measure.
Process tuning buys margin; only a thinner rib removes the cause.
The chart below is a typical result from that measurement step. Use it to separate a design limit from a setting that can still be recovered.
Rib-to-wall ratio and root radius for the drawing
Keep ribs at 0.5-0.6 times a 2.5 mm wall, so 1.3-1.5 mm, with a root radius under 0.25 mm, to hold sink below the 20 um legibility limit on the drawing.
| Parametre | Typical target | What goes wrong outside it |
|---|---|---|
| Rib to nominal wall ratio | 0.5-0.6 | At 0.8 the sink exceeds 38 um as moulded |
| Root fillet radius | At most 0.25 mm or 0.25 x wall | A large radius adds mass at the rib root |
| Sink depth after paint bake | At most 20 um | Above this it reads under a high-gloss topcoat |
| Hold pressure | 50-65 MPa | Low pack lets the rib root shrink away |
Table 2 - Rib and sink parameters for the drawing
Process settings that move the margin
Higher hold pressure near 60 MPa and a cooler 70 C mould reduce the as-moulded sink, but they cannot rescue a rib that is simply too thick for the wall.
| Decision | Effect on sink | Trade-off |
|---|---|---|
| Thin rib from 0.8 to 0.6 x wall | 38 um down to about 12 um as moulded | Tool change; slightly less stiffness |
| Raise hold pressure 45 to 60 MPa | Reduces root shrink | Risk of sticking and higher ejection force |
| Lower mould temperature 90 to 70 C | Skins over sooner | Can raise residual stress and post-bake bow |
| Accept only on painted first articles | Tests the real condition | Adds a paint step to sampling |
Table 3 - Decisions that set painted-panel read-through
Define acceptance on the finished part
Agree acceptance on the finished part: a maximum sink depth measured after the full paint bake under a defined gloss and viewing distance, not on the raw moulding.
Not sure whether the fault is in the tool or the process?
Send us the drawing, the process window and a few sample parts. We will tell you which change fixes the fault before you commit to a tool modification.
What to send us
- Part drawing with the affected dimension
- Current process settings
- Sample parts from a good and a bad batch
- Annual volume
Sampling rules that catch telegraphing early
Trim hold pressure and extend cooling first; thinning the rib in the steel is the permanent fix. Always re-measure painted panels, because unpainted readings understate the fault.
Before you release this injection moulding job
- Rib thickness is specified as a ratio of nominal wall on the drawing
- Root fillet radius is dimensioned, not left to the toolmaker
- Maximum sink depth is defined on the painted part after the production bake
- Gloss level and viewing distance for the visual check are agreed
- First-article approval includes painted panels from every cavity
Attach this list to the RFQ. Most moulding faults are decided at the drawing stage.
Why is the sink invisible before painting?
A 10-20 um depression scatters little light on a moulded texture. A high-gloss topcoat levels optically and a 120 C bake releases stress, so the same depression reads as a rib shadow.
Is this the same as a normal sink mark?
The mechanism is the same local shrink at a thick rib root, but the dispute here is a part that passed raw inspection and failed after coating, so the acceptance condition must be the painted part.
What rib-to-wall ratio should we use?
0.5-0.6 of the nominal wall is a safe default; on a 2.5 mm wall that means a 1.3-1.5 mm rib with a root radius under 0.25 mm.
Can more hold pressure hide it?
Raising pack from 45 to 60 MPa reduces root shrink, but an oversized rib will still telegraph. Use pressure for margin, not as the fix.
Does a lower mould temperature help?
A cooler 70 C mould skins the surface sooner and can reduce the as-moulded sink, but it may add residual stress that reappears after the paint bake.
Who owns the rejected painted panels?
Define it up front. If the drawing only specifies raw-part flatness, the moulder passes and the painter inherits the claim; specify post-paint sink depth instead.
Get a mouldable part and a fixed quotation
Send us the part file and the failure history. Our engineers will return a DFM review, a material recommendation and a fixed quotation with a defined first-article acceptance test.
To get an accurate quote, send:
- 3D file or 2D part drawing
- Resin grade and any regrind limit
- Annual volume and target unit price
- The failed sample or defect photos
Request a DFM review and quote
Why buyers work with Uplastech
ISO 9001, ISO 14001 and ISO 45001 certified. Founded in 2016, with injection moulding lines in Shanghai and an extrusion plant in Jiangsu. Moulding machines from 90T to 1100T and a maximum shot weight of 5100 g. Samples and a written quotation are available on request.

 TR
 EN
 ES
 FR
 DE
 PT
 AR
 RU
 JA
 KO
 IT
 NL
 PL
 ID