

What the plug does that vacuum cannot
Vacuum forming pulls the sheet into the cavity, and the sheet thins where it is drawn deepest. On a deep part the base becomes thin and the corners become thin twice over, and the result is a part that is strong at the flange and weak everywhere else.
A plug pushes material from the back before the vacuum is applied. It carries the hot sheet down into the cavity mechanically, so the material is stretched by contact with the plug rather than by air pressure alone. The material that would have thinned at the base is instead distributed along the walls.
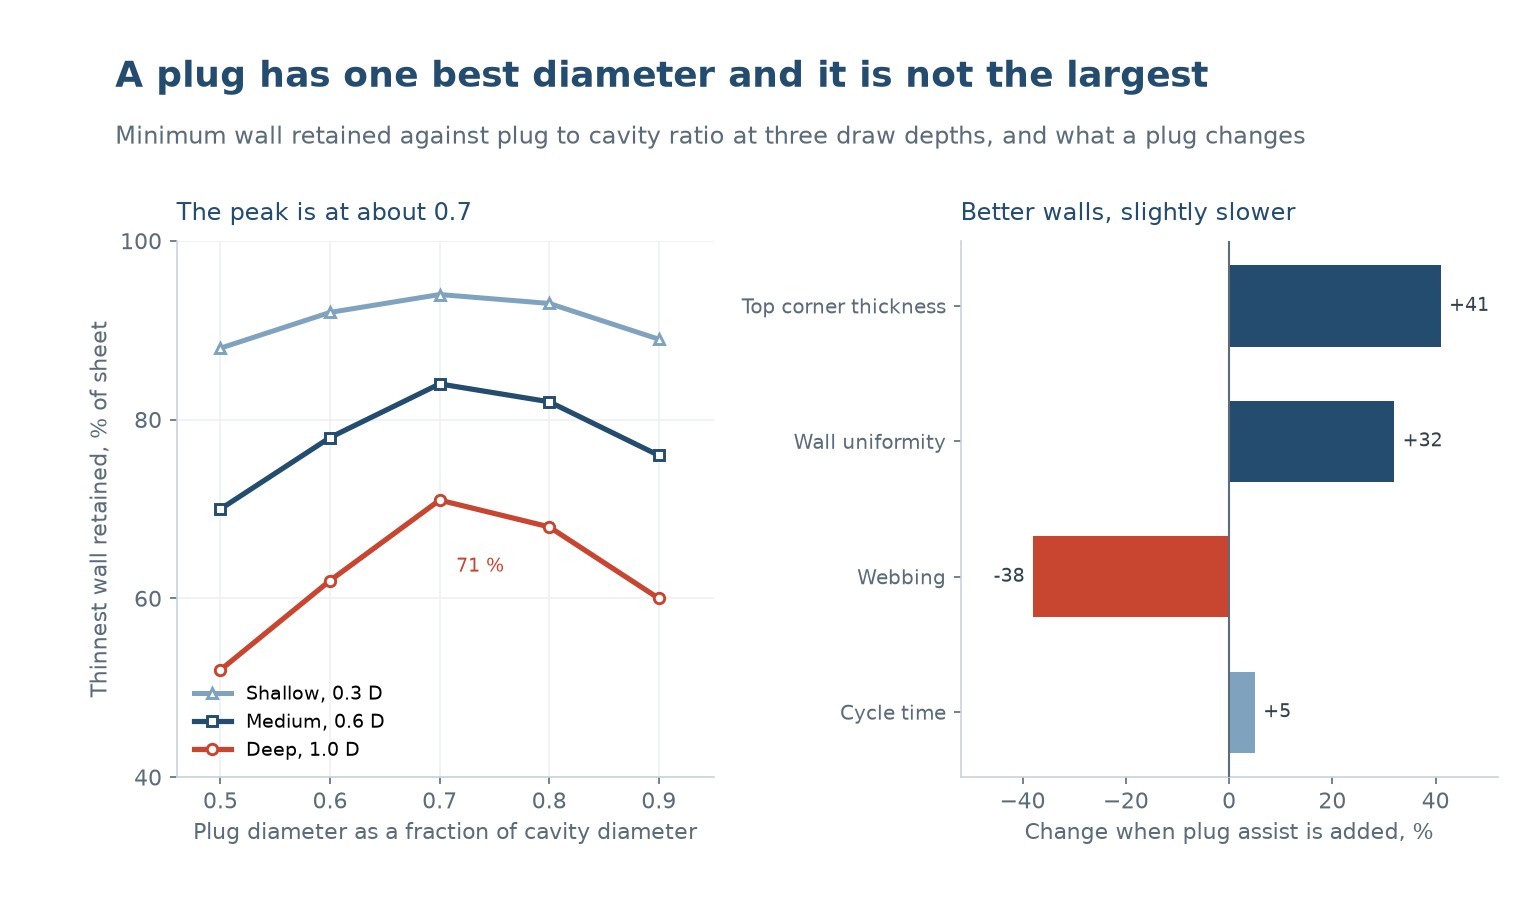
The result is a much more uniform wall. On a deep container, a wall uniformity of 2 to 1 without a plug becomes 1.2 to 1 with a well matched plug, which is the difference between a part that passes a drop test and one that does not.
The plug also controls where the material goes. Because it contacts the base first, it chills that area and makes it stiffer, so the subsequent stretching happens in the walls instead of in the base. That chilling effect is as important as the mechanical push, and it is why plug temperature matters.
Diameter: there is one best size
The chart on the left plots the thinnest wall retained against the plug diameter as a fraction of the cavity diameter, for three draw depths. All three curves peak at about 0.7, and all three fall away on both sides.
A plug that is too small does not contact enough of the sheet. The material flows past it and thins at the base just as it would without a plug. A plug that is too large grips the sheet against the cavity wall, and the material cannot slide, so it stretches where it is held and thins there instead.
The peak is at 0.7 for a round cavity. For a rectangular one the equivalent is a plug that leaves a clearance of about 10 to 15 percent of the cavity width on each side, and the same logic applies: enough contact to push, enough clearance to slide.
The depth changes how much the plug helps, not where the optimum is. At 0.3 D the shallow part gains only a few points from the plug, at 1.0 D the gain is 20 points. A shallow part rarely needs a plug at all; a deep one cannot be made well without one.
Plug temperature and material
A cold plug chills the sheet where it touches, which is what you want at the base: a stiff base pushes the stretching into the walls. A plug that is too cold marks the surface and can freeze the material before it has flowed, leaving a patch that will not form.
A hot plug does the opposite. It keeps the material soft and lets it slide, which helps on a part with a difficult shape but produces a thinner base. The right temperature is usually 20 to 60 C below the sheet temperature, and it is a setting to be tuned per part rather than a rule.
The plug material matters for the same reason. A syntactic foam plug insulates, so it stays near the sheet temperature and does not chill the surface. A felt plug is softer and marks less. An aluminium plug conducts and chills quickly, which is good for the base and hard on the surface finish.
Surface finish on the plug transfers to the part. A polished plug leaves a polished mark on the base; a textured one leaves a matte patch. If the base is a visible surface, the plug finish is a cosmetic specification, not just a tooling detail.
Timing against the vacuum
The plug has to arrive before the vacuum does, but not much before. If the vacuum comes on while the plug is still travelling, the sheet is pulled away from the plug and the assist is lost. If the plug dwells too long before the vacuum, the material chills and the corners will not form.
The usual sequence is: plug down to its stop, vacuum on within 0.1 to 0.3 seconds, plug retract after the part has taken the cavity shape. The plug speed matters as well: a fast plug punches the material and thins it locally, a slow one lets it flow.
On a machine with a servo plug, all three of those are settings. On a pneumatic one, the speed is set by a flow control and the timing by a cam or a sensor. Either way, the sequence is part of the process and should be recorded with the temperature and pressure.
| Setting | Typical value | Symptom if wrong |
|---|---|---|
| Plug diameter ratio | 0.65 to 0.75 of cavity | Thin base or gripped walls |
| Plug temperature | 20 to 60 C below sheet | Marks, or a base that will not form |
| Plug speed | Slow, controlled | Local thinning at the contact point |
| Vacuum delay after plug | 0.1 to 0.3 s | Lost assist, or chilled corners |
| Plug dwell | Until the part is set | Corner detail missing |
Table 1 — The five settings that decide whether the plug helps
When a plug makes it worse
On a shallow part, a plug adds a mark and a cycle step for no gain. If the draw ratio is under about 0.4, vacuum alone gives an acceptable wall and the plug should stay retracted.
On a part with undercuts or deep ribs, the plug cannot follow the shape and will bridge over the features, leaving them unformed. Those parts need pressure forming or a different tool design rather than a plug.
On a thin gauge sheet, the plug can push through. A 0.5 mm sheet at forming temperature has very little strength, and a plug that is slightly too fast or too cold will puncture it. Thin gauge work usually needs a soft felt plug and a slow approach.
And on a part where the base is the visible surface, the plug mark is a defect. That is a design conversation, not a process one: either the base gets a texture that hides the mark, or the part is formed the other way up.
Designing the tool around the plug
The cavity needs a radius at the base that the plug can push material into. A sharp internal corner at the base cannot be filled by a plug, because the material has to turn a corner with no room. A radius of at least half the wall thickness is the minimum, and one wall thickness is better.
The plug needs clearance at the sides, and that clearance becomes the wall thickness plus the draw allowance. If the plug is 0.7 of the cavity and the cavity is 100 mm, the gap is 15 mm per side, which is far more than the wall thickness, so the material has room to slide.
The plug also needs a lead-in. A square edged plug catches the sheet and drags it; a plug with a 5 to 10 mm radius at the leading edge pushes it smoothly. That radius costs nothing and prevents a whole class of marking defects.
| Draw ratio | Plug needed | Expected uniformity | Note |
|---|---|---|---|
| Under 0.4 | 아니요 | 1.3 to 1 | Vacuum alone is enough |
| 0.4 to 0.7 | Optional | 1.2 to 1 | A plug improves the corners |
| 0.7 to 1.2 | 예 | 1.15 to 1 | Plug assist is standard |
| Above 1.2 | Yes, plus pressure | 1.1 to 1 | Consider pressure forming |
Table 2 — When the draw ratio calls for a plug
The table is a guide rather than a rule, because the material matters as much as the geometry. A material with a wide rubbery plateau tolerates a deeper draw without a plug than one with a narrow one, and the difference between PP and PET on the same tool is considerable.
What size should the plug be?
About 0.7 of the cavity diameter for a round cavity, which leaves enough clearance for the material to slide and enough contact to push it. A plug that is too large grips the sheet and thins the walls it is supposed to protect.
Does plug assist make the base thinner?
It can, if the plug is too hot or too large. A cold plug chills the base and stiffens it, which pushes the stretching into the walls. A hot plug keeps the base soft and it thins.
Why does the plug leave a mark on the base?
Because the surface of the plug transfers to the part. Use a felt or syntactic foam plug, polish the plug, or design the part so the base is not a visible surface. The mark is a tooling decision, not a process fault.
When should the vacuum come on?
Within 0.1 to 0.3 seconds after the plug reaches its stop. Earlier and the sheet is pulled away from the plug; later and the material chills before the corners are formed.
Can I use a plug on a shallow part?
You can, but it adds a mark and a cycle step for almost no gain. Below a draw ratio of about 0.4, vacuum alone gives an acceptable wall.
What plug material is best?
Syntactic foam for insulation and a stable temperature, felt for soft contact and thin sheet, aluminium where chilling the base is the priority. The choice is a trade between surface finish and thermal control.
Deep part with an uneven wall?
Send the part drawing, the draw depth and the material. We will tell you the plug diameter, the temperature and whether a plug is needed at all.




 KO
 EN
 ES
 FR
 DE
 PT
 AR
 RU
 JA
 IT
 NL
 TR
 PL
 ID
