The problem
Symptom. A buyer reads the 180.0 mm flange of a formed tray at 179.55 mm and the supplier reads 180.05 mm, a 0.50 mm gap on a +/-0.4 mm tolerance, so first-article approval stalls.
What it costs. A 90 000-part first-article lot cannot be released, and both sides defend their own calliper reading while the real fault sits in two different fixtures and no agreed datum.
This guide shows how to run a gauge R&R study, define a 3-2-1 datum and fixture, and write a measurement method into the tray drawing.
- 1. The disagreement is a measurement-system fault, not a part fault
- 2. Run a gauge R&R study before debating the dimension
- 3. Datum, fixture and gauge to specify on the drawing
- 4. Variables that widen the spread after first-off
- 5. A gauge R&R gate for first-article approval
- 6. Costing one shared fixture against a stalled first article
The disagreement is a measurement-system fault, not a part fault
A dimensional disagreement is usually a measurement-system problem. A 0.50 mm spread between buyer and supplier on a 0.80 mm tolerance band consumes 0.50 / 0.80 = 62.5 % of the band before any part variation is considered.
| What each side reports | What is physically happening | First measurement |
|---|---|---|
| Buyer and supplier differ by 0.50 mm | Two fixtures reference different datums | Gauge R&R with 10 parts, 3 operators, 3 repeats |
| Reading drifts with the operator | Hand-held calliper angle and force vary | Repeatability from the R&R study |
| Good at 20 °C, bad in a warm store | Calliper and tray expand with temperature | Reading at 20 °C and 30 °C |
| One corner of the flange worse | Warped nest lifts a datum pad | Flatness of the three locating pads |
Table 1 - Classifying a measurement disagreement before re-cutting the tool
Run a gauge R&R study before debating the dimension
Run the standard study: 10 parts × 3 operators × 3 repeats = 90 readings on the same 180.0 mm flange. An unfixtured calliper returns about 24 % gauge R&R; a 3-2-1 nest with a dial indicator brings it to 8 %.
A five-step diagnostic sequence
- Agree the datum.
Mark a 3-2-1 datum and three locating pads on the tray drawing. - Build one fixture.
Use a single granite nest with a dial indicator at 20 °C for both parties. - Run the study.
Measure 10 parts × 3 operators × 3 repeats and compute gauge R&R. - Check the fixture.
Verify pad flatness and locating error below 0.1 mm before first-off. - Gate the approval.
Release the first article only when gauge R&R is ≤ 10 %.
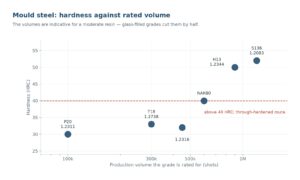
The chart below is a typical result from that measurement step. Use it to separate a design limit from a setting that can still be recovered.

Datum, fixture and gauge to specify on the drawing
Three things belong on the drawing: a 3-2-1 datum on the mould-side face, a single nest fixture with three locating pads, and a dial indicator at 20 °C. With a 0.1 mm locating error, gauge R&R stays under 10 %.
| Parametre | Typical target | What goes wrong outside it |
|---|---|---|
| Gauge R&R | ≤ 10 % of the tolerance | Above 10 % the measurement cannot judge the part |
| Study plan | 10 parts × 3 operators × 3 repeats | 90 readings expose repeatability and reproducibility |
| Datum scheme | 3-2-1 on the mould-side face | Each side otherwise references a different face |
| Measurement temperature | 20 °C +/- 1 °C | A 30 °C calliper reads a different flange width |
Table 2 - Measurement parameters to write on the tray drawing
Variables that widen the spread after first-off
The spread widens again as conditions change. A calliper held at 30 °C expands, a warped nest lifts one datum pad, and a different operator measuring the flange at a 15° angle adds parallax error each time.
| Process variable | Effect on gauge R&R | Practical control |
|---|---|---|
| Calliper used instead of a nest gauge | Operator angle and force dominate the spread | Fix a dial indicator in a 3-2-1 nest |
| Measurement at 30 °C | Thermal expansion adds apparent drift | Measure at a declared 20 °C |
| Datum not marked on the drawing | Each side picks its own reference face | Dimension from the three datum pads |
| Nest pad worn by 0.1 mm | Locating error raises gauge R&R above 10 % | Re-qualify the fixture before first-off |
Table 3 - Variables that widen the measurement spread after first-off
A gauge R&R gate for first-article approval
Two readings cannot settle a first article. Add a clause: gauge R&R ≤ 10 % from 10 parts × 3 operators × 3 repeats, on a declared 3-2-1 datum and fixture at 20 °C, before any dimension is judged.
Want the tray checked against your line?
Send us the tray drawing and the line conditions. We will flag the geometry and material choices that cause jams, and quote a tool with an acceptance test.
What to send us
- Tray drawing with draft and radii
- Sheet grade and gauge
- Stack depth and line speed
- Drawings of the magazine or denester
One shared nest fixture and a written datum cost roughly £800-1 500 but release the 90 000-part first article. A week of held parts and a re-inspection sort cost more than the fixture across the order.
Before you sign off this thermoformed tool
- A 3-2-1 datum and three locating pads are dimensioned on the tray drawing
- A single shared nest fixture and dial indicator are named in the inspection method
- Measurement temperature of 20 °C +/- 1 °C is stated on the drawing
- A gauge R&R ≤ 10 % from 10 parts × 3 operators × 3 repeats gates first-article approval
- Both parties use the same fixture and record the 90 readings together
A tray that looks right in the carton can still stop a filling line. Test the stack, not a single part.
Why do buyer and supplier disagree by 0.50 mm?
They are usually measuring different datums with different fixtures. On a 0.80 mm tolerance band a 0.50 mm spread consumes 62.5 % of the band. Run a gauge R&R study before discussing the part.
What is an acceptable gauge R&R?
Under 10 % of the tolerance is acceptable for first-article approval; 10-30 % is marginal. An unfixtured calliper returned about 24 %, and a 3-2-1 nest with a dial indicator brought it to 8 %.
Why 10 parts, 3 operators and 3 repeats?
The 10 × 3 × 3 = 90 readings separate part variation, operator reproducibility and gauge repeatability. A single reading cannot show which of the three dominates the 0.50 mm spread.
Can a better calliper fix it?
Not on its own. The datum and the fixture decide where the measurement sits. Specify the three locating pads and hold the gauge in a nest at 20 °C, then re-run the R&R study.
Does temperature really matter?
A calliper and a 180 mm PET tray both expand between 20 °C and 30 °C. State 20 °C +/- 1 °C in the inspection method so the two parties' numbers are comparable.
What should the first-article clause say?
Gauge R&R ≤ 10 % of tolerance from 10 parts × 3 operators × 3 repeats on a declared 3-2-1 datum and shared fixture at 20 °C +/- 1 °C, with the 90-reading record attached to approval.
Get a tray that runs on your filling line
Send us the tray drawing or a sample stack. We will review draft, trim and material, then quote a production tool with a measurable line-acceptance test written into it.
To get an accurate quote, send:
- Tray drawing or sample stack
- Sheet material and gauge
- Line speed and denesting method
- Annual volume and target unit price







 TR
 EN
 ES
 FR
 DE
 PT
 AR
 RU
 JA
 KO
 IT
 NL
 PL
 ID