
- 1. Two numbers on the same screen, two different jobs
- 2. Cushion: the floor and the ceiling
- 3. Why too much cushion is as bad as too little
- 4. Decompression: the setting that exists to stop drool
- 5. A drifting cushion is the cheapest diagnostic you have
- 6. Setting both from a shot weight study
- 7. What to specify
Two numbers on the same screen, two different jobs
Cushion and decompression both describe where the screw is at the end of recovery, and they are usually set by the same person in the same five minutes. They do different jobs. Cushion is the material left in front of the screw after the shot, and it is the reserve that the packing phase draws on. Decompression is the small backward movement after recovery, and it is there to take pressure off the melt so the nozzle does not drip between shots.
Confusing them produces two classic mistakes. Setting a large cushion because it feels safer, which lengthens the residence time and degrades the melt. Setting a large decompression because drool appeared once, which pulls air into the nozzle and produces silver streaks on the next shot.
Both are measured in millimetres and both are on the recovery screen, which is why they get treated as one setting. They are not: cushion is a consequence of the shot size, decompression is a deliberate movement.
Cushion: the floor and the ceiling
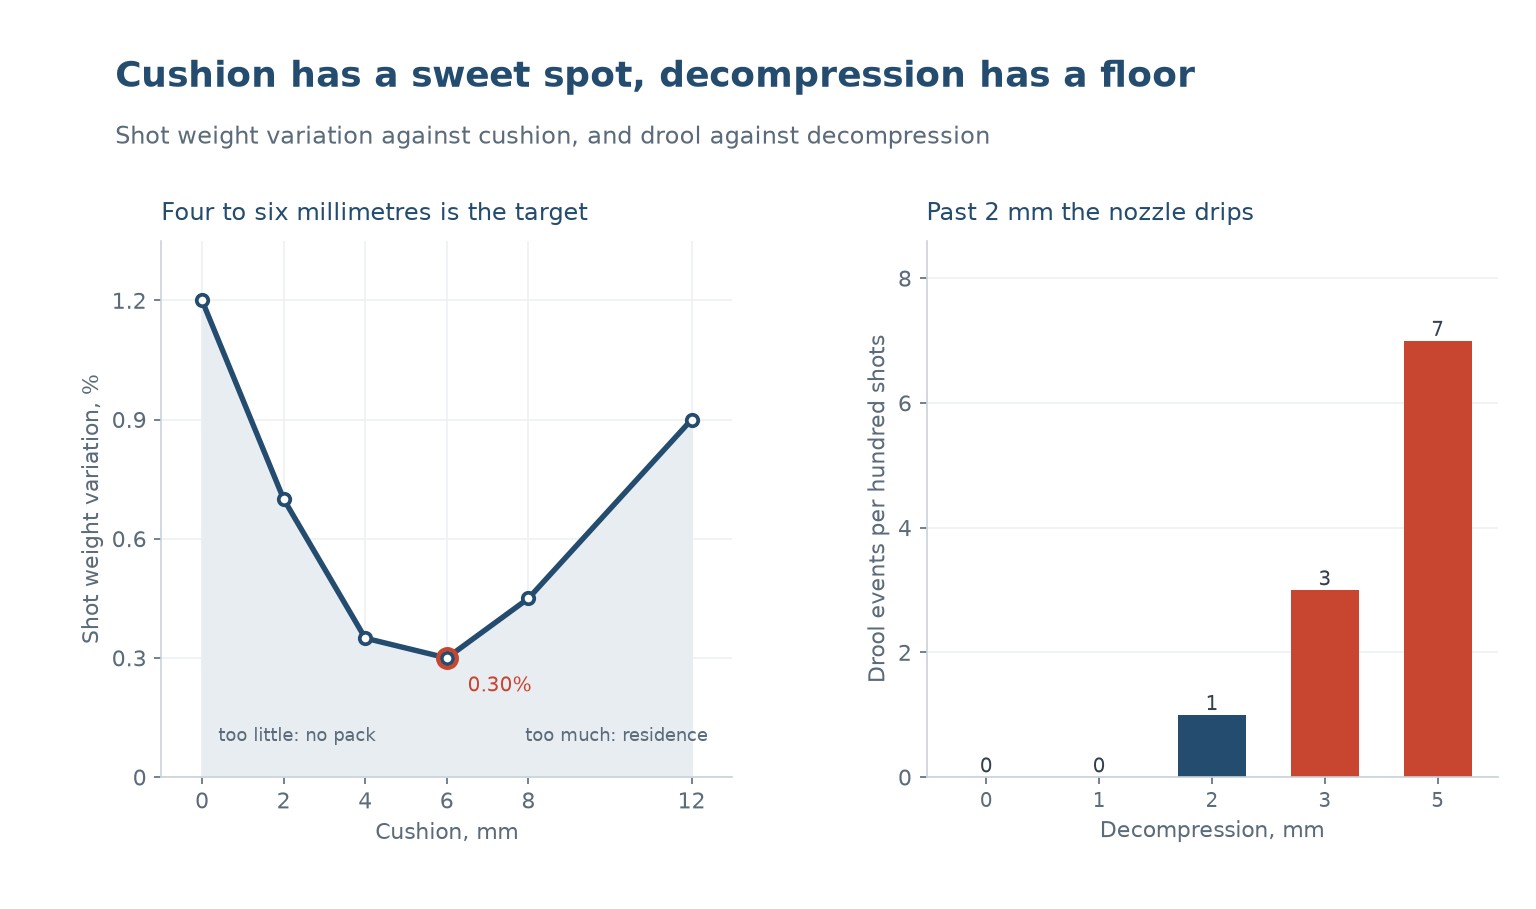
Shot weight variation against cushion: 1.20 percent at zero, 0.70 at 2 mm, 0.35 at 4 mm, 0.30 at 6 mm, 0.45 at 8 mm and 0.90 at 12 mm. The curve is a valley, and both sides of it are real failures with different causes.
At zero cushion the shot used everything that was in front of the screw. There was no material left to pack with, so the packing phase did nothing, and the part is whatever the fill phase happened to deliver. Variation is high because fill is the least repeatable phase: it depends on viscosity, on the check ring seal and on how much the previous shot left behind.
The floor of the valley is at 4 to 6 mm, which is enough reserve to pack with and short enough that the material in front of the screw has not been sitting there long. That is the whole reason for the upper limit: cushion is dead volume. A 12 mm cushion on a small shot means a pool of melt that has been through several cycles of heating, and its viscosity and colour have both moved.
Why too much cushion is as bad as too little
A large cushion is not a safety margin, it is a residence time. The material at the front of the screw is not replaced every shot; it is pushed forward a little and left, so the number of cycles it spends at temperature is roughly the cushion divided by the shot stroke, multiplied by the cycle time. A 12 mm cushion on a 40 mm stroke with a 25 second cycle means the front of the melt is 7.5 seconds older per cycle than a 4 mm cushion.
Over a shift that is enough to show as colour drift on a masterbatch, as a drop in molecular weight on a hygroscopic engineering resin, and as black specks on anything that degrades at the barrel temperature. The symptom is a part that is correct at the start of the run and slightly off at the end, which gets diagnosed as machine drift rather than as a cushion setting.
There is a second effect, which is that a large cushion makes the shot size control less direct. The machine controls the shot by the screw position at the end of injection, and with a large cushion that position is a long way from the material that is actually being packed.
Decompression: the setting that exists to stop drool
Decompression, or suck-back, retracts the screw slightly after recovery. It relieves the pressure in front of the screw so that the melt does not continue to weep out of the nozzle between shots. Drool events per hundred shots against decompression: zero at 0 and 1 mm, one at 2 mm, three at 3 mm and seven at 5 mm.
That last column is the surprise for most operators. Decompression causes drool as well as curing it, because past a certain point the retraction pulls the melt column apart and draws air in through the nozzle. The air sits in front of the screw, and the next shot pushes it into the cavity as a silver streak or a short shot.
So decompression has a window rather than an optimum: enough to release pressure, not enough to break the melt seal. On most machines and most materials that window is 1 to 2 mm. Above 3 mm the drool you were trying to cure comes back for a different reason, and the diagnosis gets confusing because the setting that was supposed to fix it is now the cause.
| Symptom | Cushion | Decompression | Most likely cause |
|---|---|---|---|
| Shot weight varies shot to shot | 0 to 2 mm | any | No packing reserve, check ring not seated |
| Colour drift through the shift | above 10 mm | any | Residence time, degraded melt |
| Drool between shots | any | 0 to 1 mm | No pressure release, nozzle too hot |
| Silver streaks on the part | any | above 3 mm | Air drawn in through the nozzle |
| Cushion drifts down over a run | falling | any | Check ring wear or a starved feed throat |
| Cushion jumps around | unstable | any | Feed inconsistency, bridging in the hopper |
Table 1 — Reading a part defect back to the two recovery numbers
A drifting cushion is the cheapest diagnostic you have
Cushion is displayed on every machine and almost nobody watches it. It is the best wear indicator on the injection unit, because it is a direct measurement of how much material the screw actually delivered against how much it was asked to deliver.
A cushion that falls steadily over a run means the check ring is leaking. The ring wears against its seat, melt slips back past it during injection, and less material arrives at the cavity. The part gets lighter and eventually short, and the operator raises the shot size to compensate, which hides the wear until the ring fails completely.
A cushion that jumps around between shots means the feed is inconsistent: bridging in the hopper, a granulator delivering uneven regrind, or a dryer that is cycling. Neither of these shows up in a shot weight check taken once a shift, and both show up immediately in a cushion trace.
Setting both from a shot weight study
The method is the same for both numbers: change one, measure twenty shots, plot the standard deviation, and find where the curve stops improving. It takes an hour and it replaces every rule of thumb in this article.
- Set decompression to 1 mm and leave it. It is a drool control, not a quality control.
- Sweep cushion from 0 to 12 mm in 2 mm steps, twenty shots each, weighed on a balance that resolves 0.01 g.
- Plot standard deviation against cushion and take the minimum, not the middle of the range.
- Check the melt temperature at that cushion against the material data sheet, because the minimum may be at a residence time the material does not like.
- Then increase decompression only until drool stops, and stop there.
The result is machine-specific and material-specific, which is why it has to be done rather than copied. A machine with a long L/D screw and a good check ring will find its cushion minimum at 3 mm; a worn machine will find it at 8 mm, because it needs more reserve to compensate for what leaks back.
| Materiał | Cushion | Decompression | What to watch |
|---|---|---|---|
| PP, PE | 3 to 5 mm | 1 to 2 mm | Low viscosity, drools easily from the nozzle |
| ABS, polystyrene | 4 to 6 mm | 1 to 1.5 mm | Forgiving, wide window on both settings |
| Poliwęglan | 5 to 8 mm | 1 to 2 mm | High viscosity, needs reserve to pack |
| Dried PA, PBT | 4 to 6 mm | 0.5 to 1.5 mm | Hygroscopic, watch for silver streaks from suck-back |
| POM | 3 to 5 mm | 0.5 to 1 mm | Very low viscosity, drips at any decompression |
| Glass-filled grades | 5 to 8 mm | 1 to 2 mm | Abrasion wears the check ring, so cushion drifts |
Table 2 — Starting points for cushion and decompression, to be verified by a shot weight sweep
What to specify
A process specification for recovery should carry the outcome, not only the settings.
- Cushion, in mm, with a minimum and a maximum, not a single target.
- Decompression, in mm, and whether the nozzle is mechanically shut off.
- Shot weight standard deviation over twenty shots, which is what the two settings exist to control.
- The cushion trend, checked at the start and end of every shift, since a falling cushion is a maintenance signal.
- Melt temperature measured by purge, because the cushion setting changes it.
The cushion maximum is the item most often missing and most often needed. Without it, an operator chasing a short shot will raise the shot size until the cushion is 15 mm, the parts come good, and the material degrades quietly for a week.
What is a good cushion value?
4 to 6 mm on most machines and shot sizes. Below 2 mm there is no reserve to pack with; above 10 mm the melt residence time starts to matter.
Why does a large cushion cause colour drift?
Cushion is dead volume. The melt at the front of the screw is only partly replaced each shot, so a large cushion means that material spends more cycles at temperature and degrades.
How much decompression should I use?
1 to 2 mm on most materials. Above 3 mm the retraction draws air in through the nozzle and causes silver streaks.
Why does decompression cause drool instead of stopping it?
Past a few millimetres the retraction breaks the melt column and lets air in, and the air pocket pushes melt out of the nozzle on the next cycle.
What does a falling cushion mean?
Almost always check ring wear. Melt slips back past the ring during injection, so less material reaches the cavity and the cushion shrinks run by run.
Can I set cushion from a table?
No. The minimum of the shot weight variation curve depends on the screw, the check ring condition and the material. Sweep it and measure.
Parts that drift through the shift?
Send the shot weight, the cushion trace and the material. We will tell you whether the problem is the recovery settings or the check ring, and what to change first.




 PL
 EN
 ES
 FR
 DE
 PT
 AR
 RU
 JA
 KO
 IT
 NL
 TR
 ID
