

Why the ink comes off
A printed mark on silicone fails in one of two ways, and they are easy to confuse. An adhesion failure separates cleanly at the interface, leaving bare silicone under the ink and a sharp edge to the remaining print. A cohesion failure tears through the ink or through the silicone skin, leaving a smeared residue and a soft edge.
The first is a surface problem: the ink never bonded. The second is usually a cure problem: the ink bonded but is too weak to survive rubbing. A third possibility, a weak boundary layer in the silicone itself, produces a cohesion failure that looks like a cure problem and is actually caused by mould release contamination.
The distinction matters because the fixes are opposite. An adhesion failure needs more surface energy. A cure failure needs more heat or more time. Applying more heat to an adhesion failure makes it worse, because the ink cures harder and shrinks away from a surface it never bonded to.
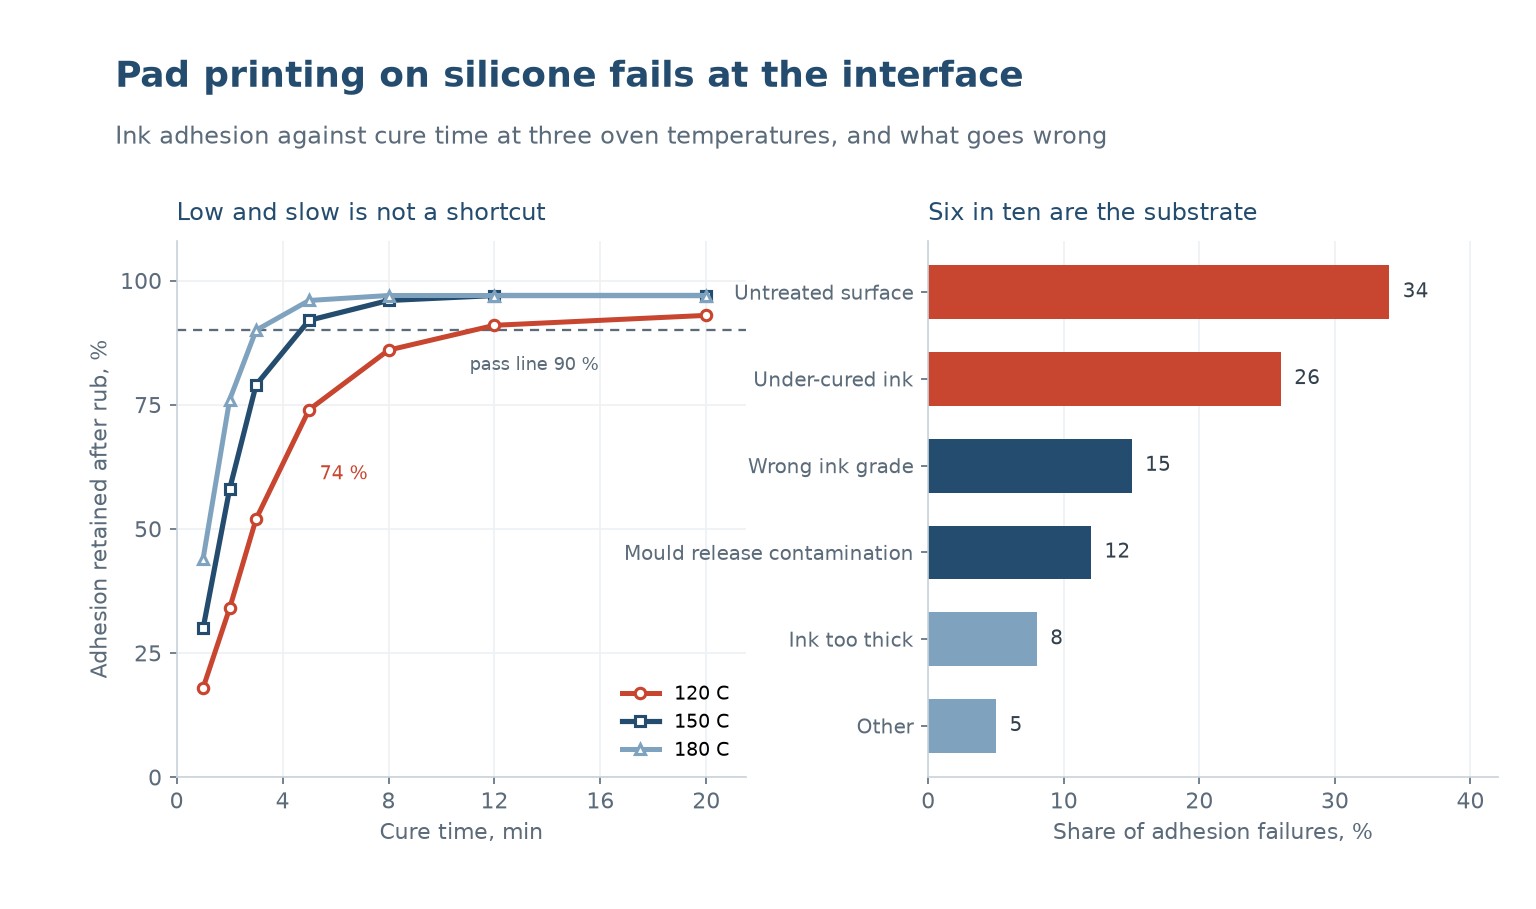
The chart on the right is the failure mix from a production line running two component silicone ink on moulded gaskets. Untreated surfaces and under-cured ink together account for 60 percent of the failures, and both are process controls rather than material problems.
Silicone ink is not paint
Silicone inks are two component systems: a pigmented base and a catalyst, usually a platinum compound. They cure by addition reaction, the same chemistry as the silicone they are printed on, which is why they can bond to it at all. They are not solvents that evaporate; they react and stay.
That chemistry sets the rules. The pot life is short, typically four to eight hours after catalysation, and it shortens dramatically at higher temperature. Ink mixed in the morning and used in the afternoon prints differently from ink mixed an hour ago, because the viscosity has risen and the transfer is poorer.
The mix ratio matters more than most operators believe. A platinum catalysed system is sensitive to catalyst concentration, and 5 percent short on catalyst produces an ink that cures slowly and never reaches full strength. Ten percent over produces an ink that cures too fast, gels in the cup and prints with a rough surface.
Inhibition is the other trap. Platinum catalysts are poisoned by sulphur, tin, amine and some plasticisers. A rubber glove, a mould release agent or a jig made from the wrong plastic can stop the ink curing at the surface, and the result is a mark that feels dry but rubs off in a smear.
Surface energy before anything else
Silicone sits at 20 to 24 mN/m and silicone ink needs a surface it can wet. Without treatment, the ink beads and the print is patchy even before curing. With plasma treatment to about 24 degrees contact angle, the ink wets fully and the print is sharp.
The treatment has to be done within hours of printing, not days. Activated silicone loses its polar surface within a week, and by then the ink will not wet it properly. A batch treated on Friday and printed on Monday is a batch that will fail a rub test on Tuesday.
Cleaning is the step before treatment and is often skipped. Mould release agent, skin oil and dust all survive a short plasma exposure and all block bonding. An isopropanol wipe followed by a drying period, then plasma, then printing, is the sequence that works.
The common shortcut, wiping with solvent and printing without plasma, produces a print that passes a light rub test and fails a heavy one. The solvent removes contamination but does not raise the surface energy, so the ink bonds weakly over most of the area and well only where the surface happened to be rougher.
Cure: temperature, time and the two-stage mistake
Silicone ink cures by addition reaction, and the reaction rate roughly doubles for every 10 to 15 C. That gives a wide range of workable schedules: 20 minutes at 120 C, 8 minutes at 150 C, 3 minutes at 180 C all reach a similar state, but they do not reach the same final properties.
The left chart shows adhesion retained after a rub test against cure time at three oven temperatures. At 120 C, 5 minutes gives 74 percent retention and 8 minutes gives 86, still below the 90 percent pass line. At 150 C, 5 minutes gives 92 and 8 minutes gives 96. At 180 C, 3 minutes already gives 90.
The two-stage mistake is to cure at a high temperature for a short time and assume the job is done. Addition cure has an induction period during which the catalyst is activating, and a short high temperature cycle can leave the surface cured while the interface is still reacting. The part passes a rub test the same day and fails one a week later.
The safer schedule is the middle one: 150 C for 8 to 10 minutes, which is long enough for the interface to react and short enough not to degrade the silicone substrate. Parts that will see solvent, repeated flexing or body contact should get a post-cure at 200 C for an hour after the initial cure.
Pad, plate and the transfer itself
The pad is a silicone rubber shape that picks ink off an etched plate and transfers it to the part. Its hardness, shape and surface condition all affect the print, and all three change with use. A pad that has printed a million cycles has a glazed surface that releases ink poorly and produces a thin, patchy mark.
Pad hardness should match the part. A soft pad conforms to a curved surface but distorts the image; a hard pad holds the image but only contacts a flat or gently curved surface. On a small silicone part with a compound curve, a medium pad with a shaped tip is usually the answer.
The plate depth sets the ink film thickness. A 25 micrometre etch gives a thin film that cures quickly and wears quickly; a 40 micrometre etch gives a thicker film that lasts longer but may not cure through in a short cycle. For silicone, 30 to 35 micrometres is the usual compromise.
Ink viscosity is the fourth variable and the one that drifts most. A cup with solvent added to keep it workable will print thinner and thinner as the solvent evaporates between additions, and the operator compensates by adding more. The result is a film that is too thin to protect itself and fails a rub test that passed at the start of the shift.
| Failure appearance | Most likely cause | First check | Fix |
|---|---|---|---|
| Clean separation, bare silicone under the ink | Surface energy too low | Dyne pen or contact angle | Plasma treatment before printing |
| Smeary removal, soft edge | Under-cured ink | Oven temperature and dwell | Longer time at 150 C |
| Patchy print with gaps | Ink not wetting | Contact angle on the part | Clean, then treat, then print |
| Print rubs off only in one area | Contamination, release agent | Mould release practice | Reduce release, add a wash step |
| Ink gels in the cup | Over-catalysed or too warm | Mix ratio and ink temperature | Remix to the supplier ratio |
| Print looks dry but smears weeks later | Catalyst poisoning | Gloves, jigs, release agents | Remove sulphur and tin from the cell |
Table 1 — Reading a failed print before changing a setting
The rub test and what it actually tells you
The standard test is a rub with a defined eraser or a cloth under a defined load, for a defined number of strokes. The exact standard matters less than using the same one every time, because the number is only useful as a comparison with a known good part.
A simple version that works in production: a pencil eraser, 500 g of load, twenty strokes along the print. A pass is a print that is still legible with no bare silicone showing. A part that fails this will fail in a customer's hands within a week.
The test should be done on a cured part, not a warm one. Ink that is still above room temperature is softer and rubs differently, and a part taken straight from the oven will pass a test that the same part fails the next morning.
It should also be done after a day, on at least one part per batch. The delayed failures, the ones caused by catalyst poisoning or by an incomplete interface reaction, only appear after the ink has had time to finish reacting. A same day test catches the gross failures and misses the subtle ones.
Setting up a process that holds
The process that holds has four controls and they are all cheap. Surface energy measured with a dyne pen at the start of the shift. Ink mix ratio recorded by weight, not by eye. Oven temperature verified with a datalogger rather than the controller display. And a rub test on a cured part from every batch.
The oven is the control most often assumed and least often verified. A convection oven with a failing element runs 20 C cold at the front and the controller never notices. A datalogger with three thermocouples across the chamber costs less than a batch of rejected parts and shows the cold spot immediately.
| Controle | Methode | Frequency | Pass criterion |
|---|---|---|---|
| Surface energy | Dyne pen at 38 mN/m | Start of shift | Line holds 3 s |
| Ink mix ratio | Weigh base and catalyst | Every mix | Within 2 % of the supplier ratio |
| Pot life | Record mix time and discard time | Every mix | Under 6 hours at 22 C |
| Oven profile | Three thermocouples on a datalogger | Weekly | Within 5 C across the chamber |
| Rub test | Eraser, 500 g, 20 strokes | Every batch, on a cured part | Print legible, no bare silicone |
| Delayed rub test | Same test after 24 hours | Daily, one part | Same result as the same day test |
Table 2 — A control set for a silicone pad printing cell
The parts that pass every check and still fail in the field are usually failing for a reason outside the printing cell: a change of mould release in moulding, a new glove supplier, a different cleaning solvent. The value of recording the controls is that it turns a mystery into a comparison, and the comparison usually points at the change nobody thought to mention.
Why does the print pass a rub test on the day and fail a week later?
The interface was still reacting when it was tested. A short high temperature cure can set the surface while the bond to the substrate is incomplete. Cure at 150 C for 8 to 10 minutes and test again after 24 hours.
Can I print on silicone without plasma treatment?
You can print, and it will look acceptable, but the bond is weak and fails a heavy rub test. Solvent wiping removes contamination without raising surface energy, so the ink bonds only where the surface happens to be rough. For anything that will be handled, treat first.
What surface energy does silicone ink need?
Around 38 mN/m or better, which corresponds to a water contact angle below 40 degrees. Untreated silicone is at 20 to 24 mN/m, so the gap is large and treatment is not optional.
Why does the ink gel in the cup before the pot life is up?
Either the catalyst ratio is too high, or the ink is warmer than it should be. Pot life halves for every 10 C above 22 C. Keep the ink at room temperature, mix to the supplier ratio by weight, and do not top up a part-used cup with fresh ink.
Does the pad material matter?
Yes. A glazed or worn pad releases ink poorly and produces a thin patchy print that looks like an adhesion failure. Pads have a finite life, typically a few hundred thousand cycles, and a pad that has been in service for years is a common hidden cause of poor print quality.
Can I use a primer instead of plasma?
A silicone primer works and is useful for repair and very low volume. In production it adds a solvent step, a flash-off time and a consistency problem. Plasma is faster, cleaner and more repeatable once the cell is set up.
Marks rubbing off silicone parts?
Send the part, the ink system and your cure schedule. We will tell you whether it is the surface or the cure, and which one to change first.




 NL
 EN
 ES
 FR
 DE
 PT
 AR
 RU
 JA
 KO
 IT
 TR
 PL
 ID
