
Packing is not filling
Filling ends when the cavity is volumetrically full. Packing begins there and does a different job: it compresses the melt to compensate for the shrinkage that happens as the part cools, and it holds that compensation until the gate freezes.
The two stages have different physics and different controls. Filling is velocity-controlled, because the flow front position has to be controlled to avoid jetting, burning and weld line problems. Packing is pressure-controlled, because the amount of material that enters is set by the pressure and by how long the gate stays open.
Confusing the two is the most common cause of a part that is dimensionally wrong. A moulder who raises the injection speed to fix a sink mark is trying to fix a packing problem with a filling control, and the result is usually flash plus a sink.
Weight saturates early
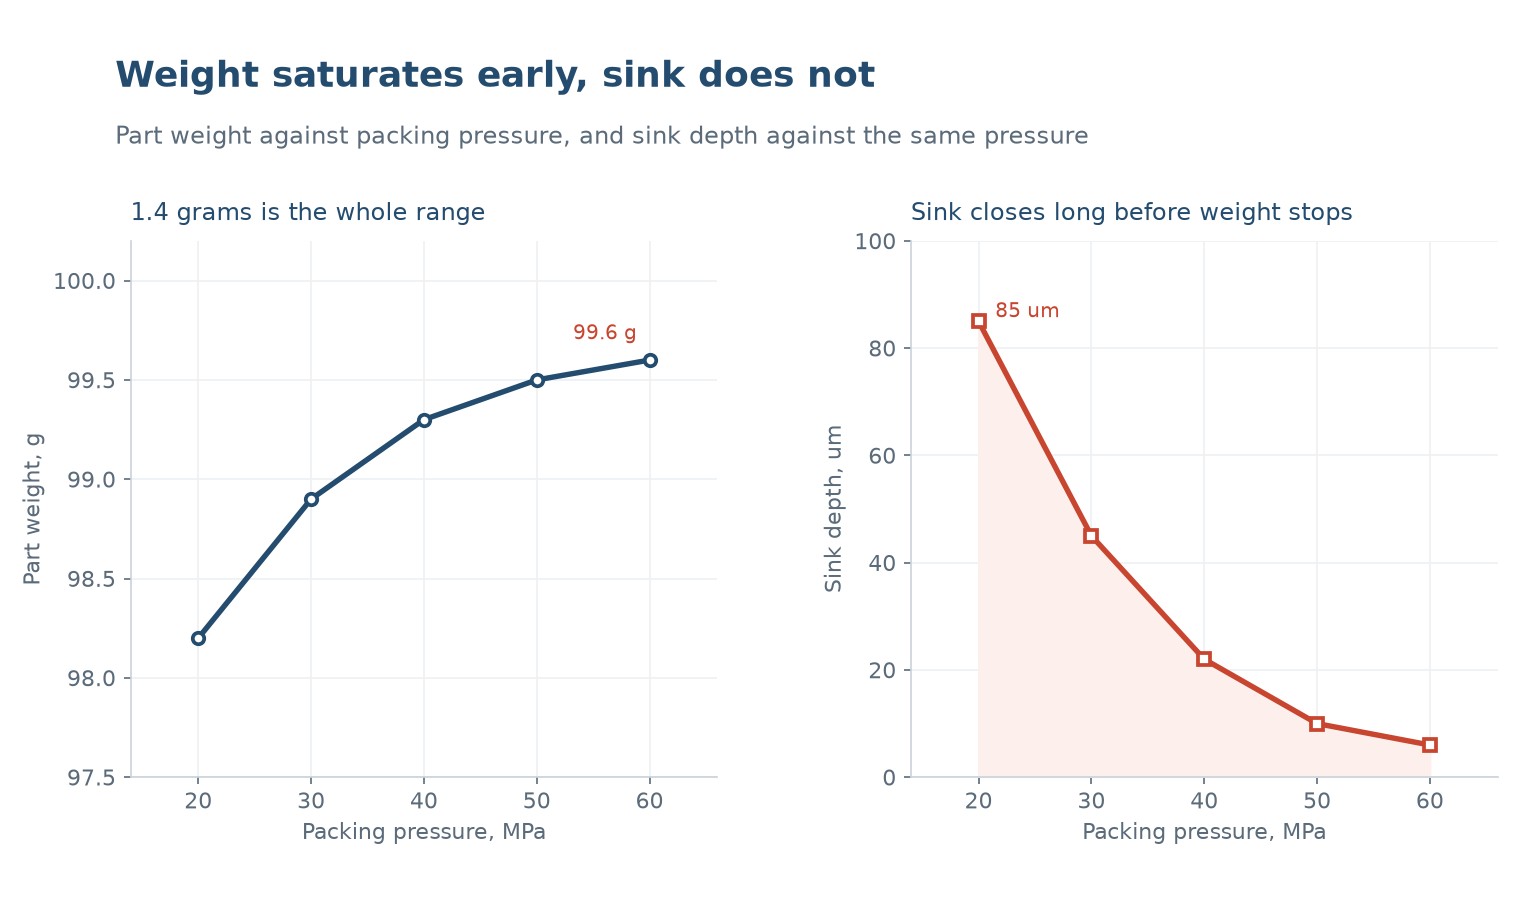
Part weight against packing pressure is a saturating curve. On a 100 gram part, 20 MPa gives 98.2 grams, 30 MPa 98.9, 40 MPa 99.3, 50 MPa 99.5 and 60 MPa 99.6. The whole range is 1.4 grams, and most of it is gained in the first 20 MPa.
The saturation is not because the material has stopped shrinking. It is because the gate has frozen, and after that no further material can enter the cavity whatever the pressure. The pressure is still applied, but it is applied to a sealed cavity, so it only changes the stress state in the part.
That is why weight is a poor control variable for packing. It changes little over the useful range and it is dominated by the gate freeze time, which is a thermal property of the tool rather than a machine setting.
| Packing pressure | Weight | Sink depth | What it controls |
|---|---|---|---|
| 20 MPa | 98.2 g | 85 um | Too low, visible sink |
| 30 MPa | 98.9 g | 45 um | Marginal |
| 40 MPa | 99.3 g | 22 um | Typical production setting |
| 50 MPa | 99.5 g | 10 um | Good, near the gate freeze limit |
| 60 MPa | 99.6 g | 6 um | No further benefit, more stress |
Table 1 — Weight and sink against packing pressure on a 100 gram part.
Sink is the sensitive measure
Sink depth is a much better indicator of packing than weight, because it responds to the local pressure in the thick section rather than to the total mass. It falls from 85 micrometres at 20 MPa to 45 at 30, 22 at 40, 10 at 50 and 6 at 60.
The curve is still saturating, and the saturation point is again the gate freeze. But it saturates later than weight, because a small amount of additional packing still reaches the thick section through a partially frozen gate. That is why a part can gain 0.1 gram of weight and lose half its sink.
The practical target is a sink depth below the level the eye can see on the finished surface, which is about 10 to 15 micrometres on a textured part and 5 on a polished one. That corresponds to 50 MPa on this part, and it is where the setting should start rather than at the maximum the machine allows.
Why a profile beats a single pressure
A single packing pressure applies the same pressure for the whole hold. A profile applies a higher pressure early, while the gate is open and the material can still flow, and a lower pressure later, when the gate has frozen and the pressure only adds stress.
The benefit is twofold. The early high pressure packs the thick section while there is still a path to it, which reduces sink. The later low pressure reduces the residual stress and the ejection force, which reduces warpage and pin marks. On a part with a thick boss and a thin wall, the difference in flatness can be 30 to 40 percent.
The profile is set in two or three steps, and the step change should coincide with the gate freeze, which is measured by weighing the part at increasing hold times until the weight stops rising. That is the only reliable way to find the freeze point, and it takes about twenty shots.
| Hold time | Weight | What it means |
|---|---|---|
| 1 s | 98.6 g | Gate still open, part not packed |
| 2 s | 99.2 g | Approaching the freeze |
| 3 s | 99.4 g | Gate frozen, weight stable |
| 4 s | 99.4 g | No further gain |
| 5 s | 99.4 g | Cycle time wasted |
Table 2 — Finding the gate freeze by weighing the part at increasing hold times.
Hold time and the gate freeze
Hold time is the duration of packing, and it should end when the gate freezes. Before that point, more time means more material and less sink; after it, more time means nothing but stress and cycle time.
The gate freeze time depends on the gate thickness, the material and the mould temperature. A 1 mm gate on polypropylene freezes in about 1.5 seconds; a 2 mm gate takes 4 to 5. That is why a part with a small gate cannot be packed properly no matter how much pressure is applied, and why a sink that will not go away is often a gate design problem.
The measurement is simple and worth doing on every new tool. Set the hold time to 1 second, weigh the part, then 2, 3, 4 and 5, and plot the weight. The curve rises and then flattens, and the flattening point is the gate freeze. Set the hold time 0.5 seconds beyond it.
Setting a packing profile
The sequence below is the one that produces a repeatable part, and it takes an hour on a new tool.
- Find the gate freeze by weighing at increasing hold times, and set the hold 0.5 s beyond it.
- Set a single packing pressure and raise it until the sink is below the visible threshold.
- Convert to a two-step profile: the first step at that pressure, the second at 60 percent of it.
- Check the part weight at both settings; it should be unchanged, and the flatness should improve.
- Check the ejection force and the pin marks, which should both fall.
- Record the profile and the gate freeze time on the setup sheet.
The gate freeze time is the number that makes the profile transferable. A setup sheet that records only the pressures will not reproduce on a tool with a different gate, but one that records the freeze time will.
What is the difference between filling and packing?
Filling is velocity-controlled and ends when the cavity is full. Packing is pressure-controlled and compensates for shrinkage until the gate freezes.
Why does part weight stop rising with packing pressure?
Because the gate freezes. After that no material can enter, so extra pressure only changes the stress in the part, not its mass.
What packing pressure should I use?
Enough to bring sink below the visible threshold, typically 40 to 50 MPa on a 100 gram part. Higher adds stress and ejection force without improving the part.
How long should hold time be?
The gate freeze time plus about 0.5 seconds. Find it by weighing the part at increasing hold times until the weight stops rising.
Why use a packing profile instead of a single pressure?
It packs the thick section while the gate is open and reduces the stress afterwards. Flatness can improve 30 to 40 percent, and pin marks and ejection force fall.
Can a small gate cause sink that will not go away?
Yes. If the gate freezes before the thick section is packed, no pressure can reach it. The fix is a thicker gate, not more pressure.
Sink that will not close, or a part that will not weigh right?
Send the part drawing with the gate detail and the current profile. We will work out the gate freeze time and whether the profile or the gate is the limit.




 ID
 EN
 ES
 FR
 DE
 PT
 AR
 RU
 JA
 KO
 IT
 NL
 TR
 PL
