
Why an approved plaque fails on the part
Colour approval usually happens on an injection moulded plaque, 2 mm thick, made on a lab machine at moderate speed. The production part is 1.4 mm thick, made on a large machine at high shear, with 15% regrind. The colour is not the same, and nobody is lying — the material simply went through a different process.
Pigments are not inert tracers. They are particles that disperse under shear, and how well they disperse changes the colour. Higher shear breaks up agglomerates, which usually increases colour strength and shifts the hue. Thinner walls scatter less light, which changes the apparent lightness. Regrind carries a heat history that shifts the shade.
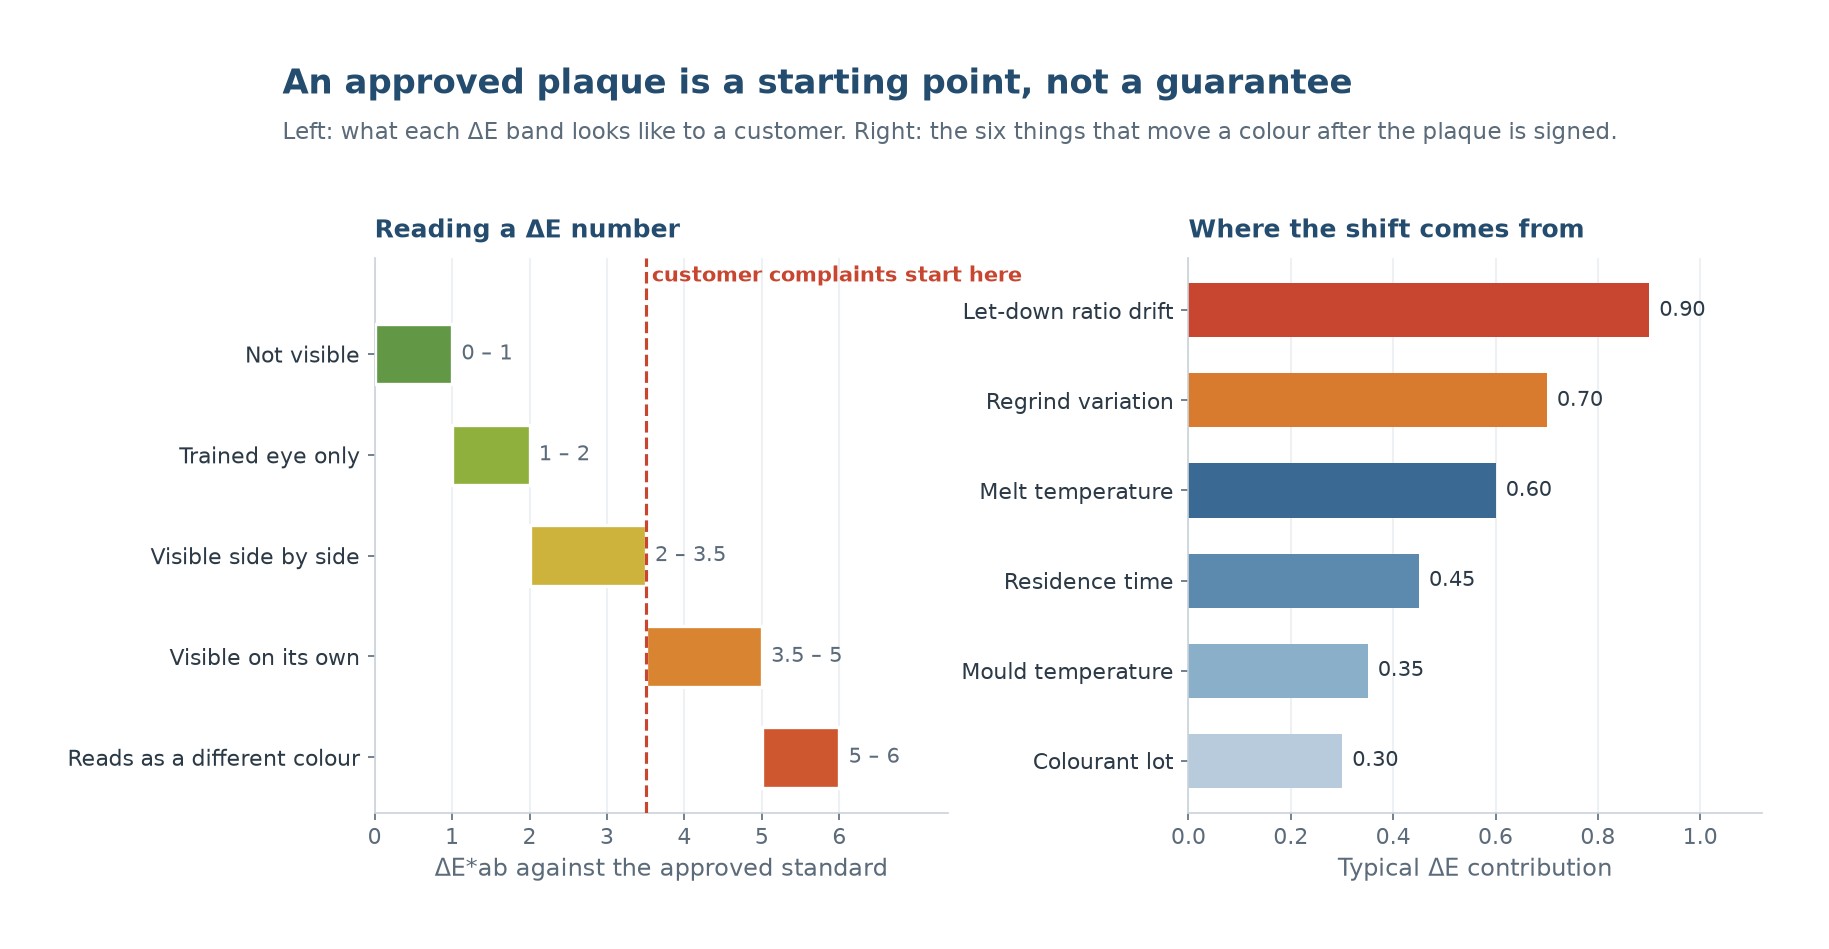
The rule: colour must be approved on a part made with the production tool, the production machine and the production material. A plaque is a starting point, not an approval. Every stage of the transition from plaque to part can move ΔE by 1–3, which is enough to fail.
What ΔE actually means
| ΔE | What it looks like | Typical acceptance |
|---|---|---|
| 0 – 0.5 | Indistinguishable | Automotive interior, tight cosmetic |
| 0.5 – 1.0 | Detectable side by side by a trained eye | Premium consumer goods |
| 1.0 – 2.0 | Visible on close comparison | Most industrial products |
| 2.0 – 3.0 | Noticeable but acceptable if not adjacent | Technical parts, hidden surfaces |
| 3.0 – 5.0 | Clearly different | Reject for most applications |
| Above 5.0 | Different colour | Reject |
Table 1 — ΔE and what it means visually. The scale is not linear in perception: 1.0 is roughly the threshold of a just-noticeable difference for a trained observer.
ΔE is calculated in a colour space (usually CIELAB) as the distance between two points. There are several formulas — ΔE*ab, ΔE CMC, ΔE2000 — and they give different numbers for the same pair of samples. ΔE2000 is the most perceptually uniform and is what most automotive and appliance customers specify. Always state which formula you are using.
Where the colour shift comes from
| Source | Effect on colour | Typical ΔE |
|---|---|---|
| Wall thickness | Thinner walls look lighter and less saturated | 0.5 – 2.0 |
| Let-down ratio | Lower ratio = less pigment = lighter | 1.0 – 4.0 |
| Shear history | Higher shear = better dispersion = stronger colour | 0.5 – 1.5 |
| Température de fusion | Higher temperature darkens or yellows | 0.5 – 2.0 |
| Regrind content | Heat history shifts shade, usually darker/yellower | 0.5 – 2.0 |
| Mould temperature | Affects surface crystallinity and gloss | 0.3 – 1.0 |
| Measurement geometry | Different instrument or aperture gives different numbers | 0.5 – 1.5 |
Table 2 — Sources of colour shift between plaque and part. Thickness and let-down ratio are the two biggest, and both are set before the machine is started.
Wall thickness is the one that catches people most often, because it is not intuitively a colour variable. A 1.4 mm part made from the same compound as a 2 mm plaque will measure lighter, because less material means less absorption and more light scattering back out. On a translucent or light colour the difference can be ΔE 1.5 without anything else changing.
Masterbatch and let-down ratio
Most colour is added as masterbatch, a concentrated pellet let down into natural resin. The let-down ratio is the weight percentage of masterbatch in the final compound, and it is the most direct control on colour strength.
| Let-down ratio | Typical use | Risque |
|---|---|---|
| 0.5 – 1% | Light tints, low pigment loading | Poor dispersion; streaking |
| 1 – 2% | Most colours | Standard |
| 2 – 4% | Strong colours, high opacity | Cost; possible mechanical property loss |
| 4 – 8% | Very strong or metallic | Dispersion problems; screw slip |
| Above 8% | Rare; usually a pre-compound instead | Not practical with most feeders |
Table 3 — Let-down ratios. Above 4% the masterbatch carrier resin starts to affect mechanical properties and processability, not just colour.
Dispersion quality matters as much as ratio. A poorly dispersed masterbatch produces a colour that is weaker than its nominal loading, with visible streaks and specks. The fix is usually a better dispersing screw section or a masterbatch with finer pigment particles — not more masterbatch, which just adds cost and makes the streaks worse.
The practical test for dispersion is a thin film or a microscope slide: press a small sample thin and look through it against a light. Agglomerates show as specks. If they are visible at 50 µm film thickness, they will be visible as colour variation on the part.
Measuring colour properly
| Requirement | Pourquoi |
|---|---|
| Same instrument | Different spectrophotometers give different absolute values |
| Same geometry (45/0 or sphere) | Geometry changes the measurement significantly |
| Same aperture size | Small apertures average differently |
| Same backing | Translucent parts measure differently over black vs white |
| Same thickness | The dominant variable for translucent colours |
| Same formula (ΔE2000) | Comparing ΔE*ab with ΔE2000 is meaningless |
| Same observer angle (10°) | Standard for industrial colour |
Table 4 — What has to be identical for a colour measurement to be comparable. Any one of these being different invalidates the comparison.
The backing issue is specific to translucent and light colours. A white part measured over a black backing reads darker than the same part over a white backing, because light transmitted through the part is absorbed or reflected by what is behind it. For any part thinner than about 2 mm in a light colour, specify the backing.
Correcting a colour that is out
| Direction of error | Likely cause | Correction |
|---|---|---|
| Too light | Low let-down, thin wall, high shear | Raise let-down; check feeder calibration |
| Too dark | High let-down, thick section | Lower let-down; check for masterbatch build-up |
| Too yellow | Overheating, regrind, degraded material | Lower melt temperature; reduce regrind |
| Hue shifted | Pigment dispersion or wrong masterbatch lot | Check masterbatch lot; verify dispersion |
| Streaky | Poor dispersion, low shear, cold melt | Raise back pressure or melt temperature |
| Batch to batch variation | Masterbatch lot variation or feeder drift | Gravimetric feeding; lot control |
Table 5 — Correcting colour errors. The yellow shift from overheating is the most common and the most often blamed on the masterbatch.
Overheating produces a yellow shift that is easy to mistake for a pigment problem. The polymer itself yellows as it oxidises, and the effect accumulates with residence time and temperature. If a colour was right last week and is yellow this week on the same masterbatch, check barrel temperatures and residence time before calling the supplier.
Setting up a colour control system
| Element | What to do | Frequency |
|---|---|---|
| Master standard | Keep a physical standard, replaced yearly | Annual |
| Production standard | A part from the approved first run | Per tool / per colour |
| Measurement procedure | Written, with instrument, geometry, backing | Once, then audit |
| Acceptance limit | ΔE2000 value agreed with the customer | Per project |
| Routine check | Measure first part and every 2 h | Per shift |
| Feeder calibration | Weigh-check the masterbatch output | Weekly |
Table 6 — Elements of a colour control system. The production standard — a real part, not a plaque — is the element most often missing.
The production standard is the key document. It should be a part from the first approved production run, kept in a dark drawer, labelled with the date, the machine, the masterbatch lot and the measured values. When a dispute arises eighteen months later, that part is the reference — not a memory of what the colour looked like.
Why does my colour look different on the part than on the plaque?
Almost always thickness and shear. A thinner part looks lighter and less saturated; higher shear on a production machine disperses the pigment better and shifts the hue. Colour has to be approved on a part made with the production tool and machine.
What ΔE is acceptable?
1.0 for premium cosmetic work, 2.0–3.0 for most industrial products, 3.0+ usually a reject. The number must be agreed with the customer and stated with the formula — ΔE*ab and ΔE2000 give different values for the same samples.
Why does my part look yellow?
Overheating or regrind. The polymer oxidises at high melt temperature and long residence time, and the yellowing accumulates. Check barrel temperatures, screw speed and regrind ratio before suspecting the masterbatch.
How much masterbatch should I use?
Whatever the colour was developed at — typically 1–4%. Changing the let-down ratio changes the colour, so it is not a free adjustment. If the colour is weak, the problem is usually dispersion rather than ratio.
Can I fix colour by changing melt temperature?
You can shift it, but it is a bad control. Temperature affects colour through degradation and dispersion, and using it as a colour control introduces a quality risk elsewhere. Fix the let-down ratio or the masterbatch instead.
Does regrind change the colour?
Yes, usually darker and yellower because of heat history. At 15–20% regrind the shift is often visible; above 30% it usually fails a ΔE 1.0 criterion. Either reduce the ratio or adjust the masterbatch to compensate.
What is metamerism?
Two colours that match under one light source and differ under another. It happens when different pigment combinations produce the same colour under one illuminant but not others. It is why colour is often checked under D65 and under a warm source — a match that only works under one is a latent complaint.
Do I need a spectrophotometer?
For any product where colour is a specification, yes. Visual matching is subjective and not repeatable between shifts. A basic handheld unit costs less than a single rejected batch, and it turns colour into a number that can be tracked.
Colour failing on production parts?
Send us the masterbatch specification, the part drawing, the current let-down ratio and your measured values. We will tell you whether the shift is thickness, dispersion or heat history — and what to change first.




 FR
 EN
 ES
 DE
 PT
 AR
 RU
 JA
 KO
 IT
 NL
 TR
 PL
 ID
