
The problem: WPC comes out of the die looking like plastic
Wood plastic composite is roughly 50–70% wood flour by weight, bound in HDPE, PVC or PP. The wood flour is what gives it the stiffness, the low thermal expansion and the machining behaviour of timber. But it is buried inside the polymer matrix, and a freshly extruded WPC profile has a smooth, slightly waxy surface that reads as plastic from ten metres away.
Everything the market pays for — the grain, the colour depth, the grip underfoot, the way it weathers — depends on getting the wood to the surface and controlling how the surface behaves. There are three industrial routes, and most WPC producers use two of them together.
Why this matters commercially: WPC decking and cladding competes with timber on appearance and with PVC on maintenance. If the surface does not read as wood, the product loses the first comparison and is left selling on price against PVC. Surface finishing is not cosmetic — it is the category's reason to exist.
The three finishing routes
| Route | How it works | Depth of effect | التكلفة |
|---|---|---|---|
| Brushing | Rotating wire or nylon brushes abrade the surface, removing the polymer skin and exposing wood fibre | 0.2 – 0.8 mm | منخفضة |
| Embossing | A heated textured roll presses a wood-grain pattern into the still-hot profile | 0.3 – 1.5 mm | متوسط |
| Co-extruded cap | A second extruder applies a thin outer layer with pigment, UV stabiliser and often a grain additive | 0.3 – 0.8 mm layer | عالية |
Table 1 — The three finishing routes. They are not alternatives in practice; most production lines run embossing plus a cap layer, with brushing used for specific textures.
Brushing: exposing the fibre
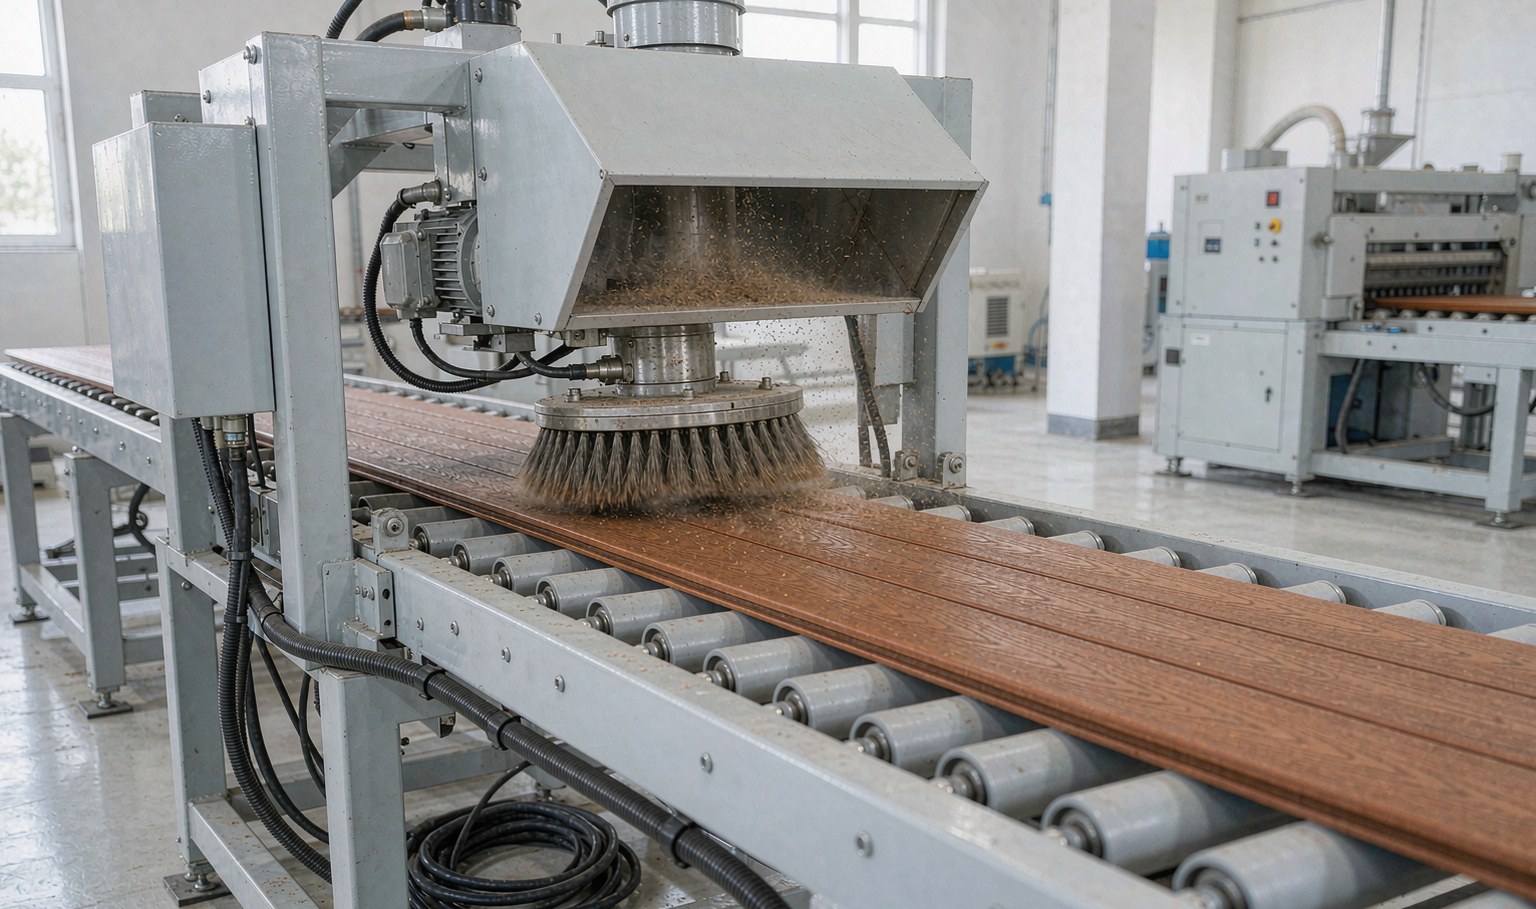
Brushing is the cheapest route and the one that most clearly reveals what the composite is made of. Wire brushes cut deeper and give a coarser, more rustic texture; nylon brushes give a finer, more uniform surface. Most lines use a sequence: coarse wire first to open the skin, then finer nylon to even it out.
The result depends heavily on the wood flour. A 40-mesh flour gives a fine, almost painted grain. An 80-mesh flour gives a coarse, open texture that looks like weathered oak. The same brushing setup produces completely different surfaces from two different formulations, which is why brushing parameters have to be tuned per formulation, not per profile.
| المعلمة | Typical range | Effect |
|---|---|---|
| Brush speed | 800 – 1,800 rpm | Higher = deeper cut, more heat, faster wear |
| Brush contact pressure | 0.5 – 3 bar | Main control on depth |
| Line speed | 1.5 – 6 m/min | Slower = more passes per unit length = deeper |
| Profile surface temperature | 40 – 90 °C | Warm surface brushes cleaner; cold surface tears |
| Wood flour mesh | 40 – 100 | Coarse flour gives a more open, more visible grain |
Table 2 — Brushing parameters. Surface temperature is the one that gets ignored and then causes tearing rather than cutting.
The failure mode of brushing is tearing. If the profile is too cold, the polymer phase is brittle and the brush rips chunks out rather than cutting fibre, leaving a fuzzy surface with visible pull-outs. If the profile is too hot, the polymer smears over the fibre and the brush does nothing. The window is roughly 40–90 °C, and it depends on the polymer: PVC runs cooler than HDPE.
Embossing: pressing grain into the melt
Embossing uses a textured roll pressed against the profile while it is still soft enough to take the pattern. It is the standard route for decking because it gives a consistent, repeatable grain across the whole run and works on surfaces that brushing cannot reach — the sides of a hollow deck board, for example.
The roll temperature is the critical variable. Too cold and the pattern does not transfer; too hot and the polymer sticks to the roll and tears on release. For HDPE-based WPC the roll usually runs at 90–130 °C, matched to the profile surface temperature at the nip.
| Embossing issue | Symptom | السبب |
|---|---|---|
| Shallow pattern | Grain visible but faint | Roll too cold, nip pressure too low, profile too cool at the roll |
| Pattern sticking | Torn surface, fibre pulled out | Roll too hot, or no release agent |
| Pattern drift | Grain repeats visibly along the length | Roll circumference not matched to line speed; pattern too small |
| Edge flattening | Pattern fades at the profile edges | Nip pressure not uniform across the width |
| Gloss variation | Patches of different sheen | Roll temperature gradient |
Table 3 — Embossing faults. The repeat-visibility problem is a design issue: the roll circumference must not be a simple multiple of the cut length or the eye picks up the repeat.
The repeat problem is worth understanding because it is the difference between a product that looks like timber and one that looks like printed laminate. A textured roll has a fixed circumference — say 600 mm. If the boards are cut at 3,000 mm, the pattern repeats exactly five times per board, and the eye finds it. The fix is either a larger roll, a non-integer relationship between roll circumference and cut length, or a randomised texture.
Co-extruded cap: the durability layer
A cap layer is a second extrusion applied over the core in the same die or immediately after it. It is 0.3–0.8 mm thick and carries the pigment, the UV package and often the surface texture. It is the most expensive route and the one that determines whether the product survives ten years outdoors.
| Cap function | What goes in it | Typical loading |
|---|---|---|
| Colour | Pigment or masterbatch, often inorganic for light colours | 2 – 5% |
| UV protection | HALS + UV absorber, sometimes TiO2 | 0.3 – 1.0% |
| Scratch resistance | Higher molecular weight polymer, or a slip/additive package | متفاوتة |
| Stain resistance | Fluoropolymer or silicone additive | 0.2 – 0.8% |
| Texture | Blowing agent or a mineral filler for a matte look | 1 – 3% |
Table 4 — What a cap layer carries. The UV package is not optional in any outdoor application; a cap without it fails faster than an uncapped board because the thin layer degrades through.
The economics are simple. A cap layer adds roughly 8–15% to material cost and requires a second extruder, but it lets the core use cheaper, darker, higher-filled compound because the core is never seen. On a deck board that is a net saving, which is why nearly all premium WPC is capped.
The cap also solves the fading problem. Uncapped WPC with wood flour exposed to UV greys within two seasons regardless of the pigment, because the lignin in the flour degrades. A cap with a proper HALS package holds colour for 10–15 years in a temperate climate.
Colour and the streaking problem
WPC colour is harder than solid plastic colour for two reasons: the wood flour is not white, so it shifts every pigment; and the flour varies between lots, so the same formulation produces different shades over time.
| النهج | Colour consistency | التكلفة | الملاحظات |
|---|---|---|---|
| Through-colour with pigment in compound | Good within a lot, drifts between lots | منخفضة | Requires tight flour spec and lot control |
| Cap layer with pigment | ممتاز | متوسط | Core colour can be anything |
| Post-finish stain or coating | Good initially, fails with wear | منخفضة | Not suitable for decking; used on cladding |
| Variegated / multi-tone | Intentional variation | متوسط | Hides lot drift; very common in decking |
Table 5 — Colour strategies. The variegated approach is not a compromise — it is the standard solution to lot-to-lot flour variation, and buyers prefer it.
Streaking is the visible symptom of poor dispersion. It shows as lighter or darker lines along the extrusion direction, and it comes from either uneven pigment dispersion or uneven flour distribution. The first is a compounding problem; the second is usually a screw design problem, because wood flour and polymer have very different bulk densities and separate easily in the feed zone.
Putting the finishing line together
| Station | Position | الغرض |
|---|---|---|
| Die and calibrator | Start | Sets profile and surface skin |
| Cooling tank | After calibrator | Partial cooling — surface must stay warm for embossing |
| Embossing roll | While surface is 90–130 °C | Transfers grain |
| Second cooling | After embossing | Sets the pattern |
| Brushing station | After cooling, before cut | Opens fibre on selected surfaces |
| Haul-off | Before saw | Controls line speed and tension |
| Saw | End | Cuts to length |
Table 6 — Finishing line sequence. The critical placement is the embossing roll: it must sit between two cooling stages, not after the whole cooling tank.
The most common line layout mistake is putting the embossing roll after full cooling. Once the profile is below about 70 °C the polymer will not take a pattern, and operators compensate by over-pressurising the nip, which distorts the profile instead of texturing it. If you are retrofitting embossing to an existing line, the roll has to go into the middle of the cooling section, which usually means splitting the tank.
Why does my WPC look like plastic rather than wood?
Because the wood fibre is still buried under a polymer skin. A freshly extruded WPC profile has a smooth, slightly waxy surface. You need brushing to remove the skin and expose fibre, or embossing to press a grain in while the surface is hot, or a cap layer with a texture additive.
What is the difference between brushed and embossed WPC?
Brushing abrades the surface to expose the actual wood fibre, so the texture is the real material. Embossing presses a pattern into the surface, so the texture is a shape, not the material. Brushed surfaces weather differently — they hold dirt more but look more natural. Most premium products use embossing for the base grain and brushing on selected faces.
Is a capped WPC board worth the extra cost?
For outdoor use, almost always. The cap carries the UV package and the pigment, which is what determines colour retention. An uncapped board greys within two seasons regardless of the pigment, because the lignin in the wood flour degrades under UV. The cap adds 8–15% to material cost and typically doubles the colour warranty period.
Why does the grain pattern repeat on my boards?
Because the embossing roll has a fixed circumference and the board length is a whole multiple of it. The eye picks up the repeat. Fix it with a larger roll, a non-integer relationship between roll circumference and cut length, or a randomised texture.
What causes fuzzy surfaces after brushing?
Brushing too cold. Below about 40 °C the polymer phase is brittle and the brush tears chunks out rather than cutting fibre, leaving pull-outs and fuzz. Warm the profile or reduce brush pressure.
Can WPC be painted?
Yes, but it needs a specific system. Standard exterior paints do not adhere well to the low-surface-energy polymer skin. You need either a brushed surface for mechanical key plus a primer, or a dedicated WPC coating. Most manufacturers recommend against painting and offer the colour range instead.
How much wood flour is in WPC?
Typically 50–70% by weight, which is 30–50% by volume. Above about 70% the melt becomes too viscous to extrude reliably and the profile loses impact strength. Below 40% the product behaves like filled plastic and loses the stiffness advantage over PVC.
Does WPC need to be sealed at the cut ends?
For decking, yes — cut ends and drilled holes should be sealed with a matching end cap or sealant. The exposed wood flour at a cut end absorbs water, and repeated wetting and drying at that point is where most field failures start.
Developing a WPC profile or improving its surface?
Send us the profile drawing, the target market (decking, cladding, fencing, furniture), the colour range and the weathering requirement. We will come back with a formulation, a finishing route and the tooling that supports it.
Continue reading
- WPC Extrusion: Formulation, Drying and Why the Vent Is Not a Dryer
- Co-Extrusion Profiles: Dual Durometer, Tri-Extrusion and Bonding
- PVC Profile Weathering: TiO2, Stabilisers and Colour Retention
- Extrusion Die Design for Profiles: Flow Balance and Die Swell
- Vacuum Calibration and Cooling in Profile Extrusion




 AR
 EN
 ES
 FR
 DE
 PT
 RU
 JA
 KO
 IT
 NL
 TR
 PL
 ID
