

What an undercut actually is
An undercut is any feature that lies outside the straight pull direction of the tool. A groove around a tray wall, a lip that turns back inwards, a snap bead, a hole in a side wall: all of them mean the part has to deform to come off the mould, or the mould has to come apart.
In injection moulding an undercut is solved with a slider or a lifter, which is expensive but routine. In thermoforming there is no second half of the tool to move, so the part itself has to do the work. The material has to stretch over the feature on the way in and spring back past it on the way out, and both steps happen at a temperature where the material is soft but not molten.
That is why undercuts in thermoforming are a material question as much as a tooling one. A polypropylene tray at 130 C will flex a long way and recover; the same geometry in rigid PVC at the same temperature will craze and tear. The tool is identical, the outcome is not.
It is also why undercuts are so often replaced by something else. A separate lid that clips on, a folded flap, a welded rim: each of those delivers the function without asking the part to deform past a feature, and each of them costs less than a split tool.
Draft angle sets the release, depth sets the draft
The chart on the left plots release success against draft angle for three undercut depths on the same polypropylene tray. A 2 mm undercut releases 84 percent of the time at 2 degrees of draft; a 5 mm undercut releases 61 percent at the same angle, and an 8 mm undercut only 33 percent.
The pattern is consistent: depth is what makes release hard, and draft is what makes it possible. To reach 95 percent release, a 2 mm undercut needs about 4 degrees, a 5 mm undercut about 7 degrees, and an 8 mm undercut about 9. Those are draft angles on the undercut face itself, not on the main wall, and they are much larger than the 1 to 2 degrees that is normal for a plain wall.
The reason is that the undercut face has to slide past the material it has just displaced. A shallow undercut only needs the wall to bend slightly; a deep one needs the whole section to rotate, and rotation is limited by the wall thickness and by how much the material has thinned at that point.
There is a second effect that the chart does not show: the tear usually starts at a corner rather than along the face. A sharp internal corner concentrates the strain, and the material fails there before the lip has moved far enough to clear. A 1 mm radius at that corner is worth more than two extra degrees of draft.
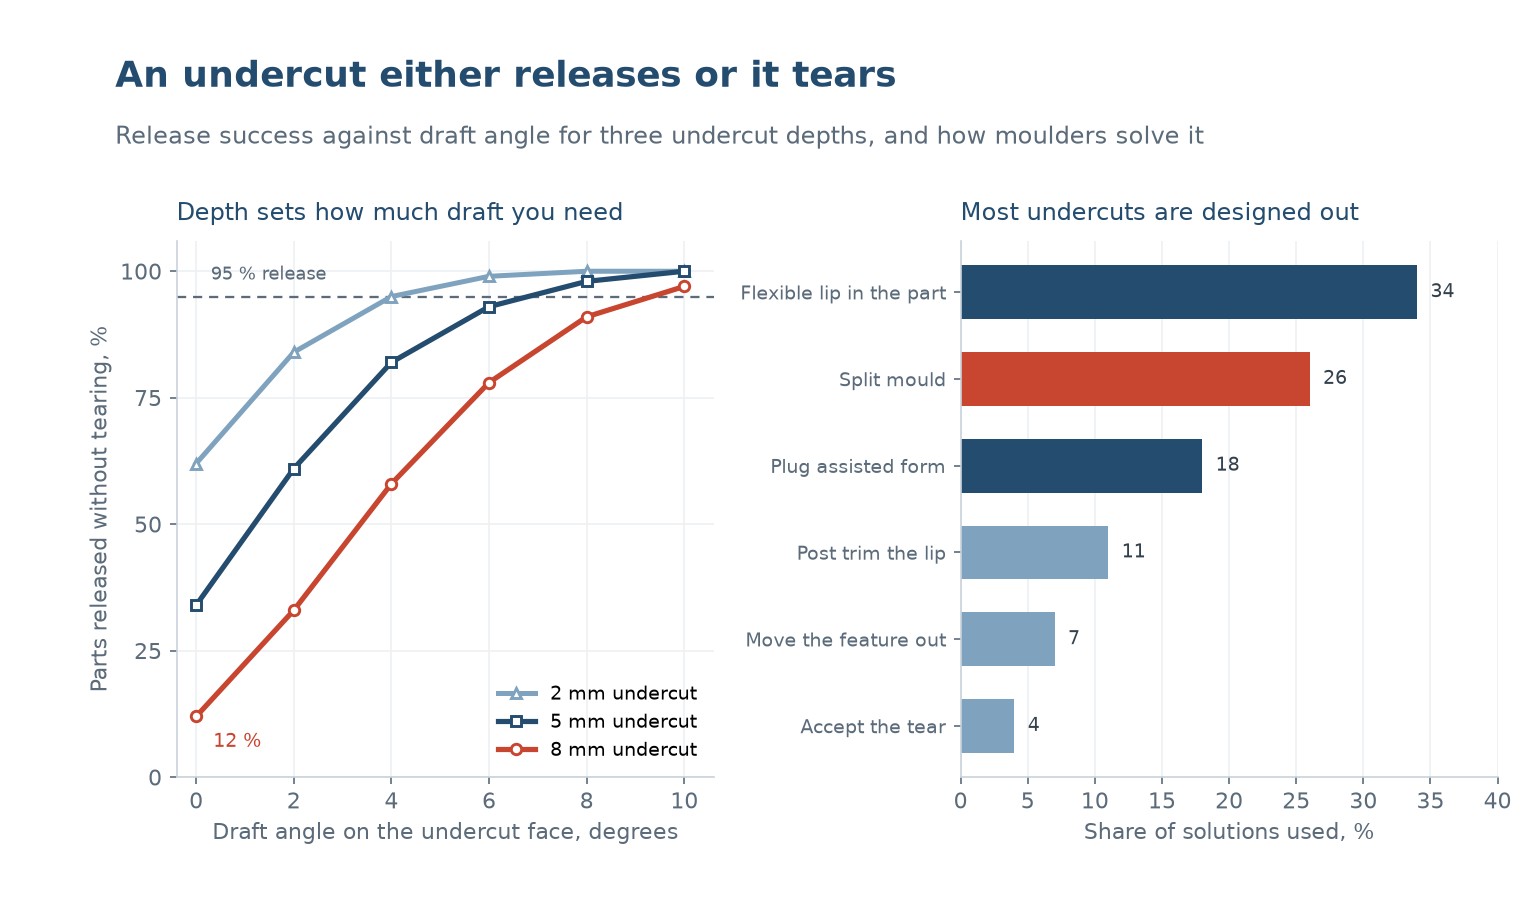
The four ways to get an undercut
The first is a flexible lip. The undercut is formed in a section thin enough to bend and spring back, typically 0.8 to 1.5 mm, and the rest of the wall stays thick. This works well on trays and containers, where the lip is at the open end and has somewhere to move. It fails on a closed shape where the thin section is trapped.
The second is a split mould. The tool is made in two or more pieces that come apart sideways before the part is ejected. It is the most reliable solution and the most expensive: a split tool for a 400 mm tray costs two to three times a one piece aluminium tool, and it needs a machine with a platen that can actuate it.
The third is plug assist with a stripper. The plug pushes the material into the cavity and holds it while the vacuum pulls the detail, and a stripper plate pushes the part off the undercut rather than pulling it. This is common on thin wall containers and it converts a tensile release into a compressive one, which the material tolerates far better.
The fourth is post forming. The undercut is cut or folded after the part is off the tool, with a punch or a hot air fold. It costs a second operation and it is completely reliable, and for low volumes it is almost always the cheapest answer.
Material and temperature decide the limit
The material has to be above its glass transition and below its melting point when it releases, which for an amorphous material is a narrow window and for a semi-crystalline one is wider. That is why PP and HDPE form undercuts more easily than PVC and PET: they have a broad rubbery plateau between the two transitions.
The temperature at release is set by the cooling time, not by the heater. A part pulled hot will flex and recover; a part pulled cold will tear. On a machine with a fixed cycle, the undercut is therefore the feature that sets the minimum cooling time, and adding one can slow the whole line.
Wall thinning matters as much. The undercut is usually formed at the end of the draw, where the wall is thinnest, and a section that has thinned to 40 percent of its original gauge has 40 percent of the strain capacity. That is why deep parts with undercuts are so much harder than shallow ones: the two effects compound.
| Materiale | Ease of undercut | Practical depth | Note |
|---|---|---|---|
| PP | Buono | Up to 6 mm with 5 deg draft | Wide rubbery plateau, recovers well |
| HDPE | Buono | Up to 6 mm with 5 deg draft | Softer, less spring back than PP |
| ABS | Moderato | Up to 4 mm with 6 deg draft | Crazes if pulled cold |
| PET | Povero | Up to 2 mm, or post form | Narrow window, strain hardens |
| Rigid PVC | Povero | Up to 2 mm, or post form | Tears at a sharp corner |
| PC | Moderato | Up to 3 mm with 7 deg draft | Needs a hot release |
Table 1 — Practical undercut depth by material, at 1 mm corner radius
Design rules that keep the part intact
Put the undercut at the open end where the material can move. A bead 5 mm inside the rim has somewhere to flex; the same bead in the middle of a closed wall does not. This single rule removes most of the difficult cases before the tool is designed.
Keep the flexing section uniform. A lip that varies in thickness bends at the thinnest point and tears at the transition, because the strain concentrates where the section changes. A constant 1.2 mm lip releases far better than a 1.5 mm lip that tapers to 0.9.
Round every corner the material has to pass. A 1 mm radius at the root of the undercut is the difference between a 60 percent release rate and a 95 percent one, and it costs nothing in the tool. Sharp corners are the single most common cause of a tearing problem that looks like a material problem.
Allow for the spring back in the dimension. A formed undercut comes out smaller than the tool by 0.2 to 0.5 mm depending on the material and the release temperature, so the tool has to be made slightly deeper. Designing to the nominal dimension without that allowance produces a feature that does not hold.
When it tears, read the tear
A tear along the whole lip means the undercut is too deep for the material at that temperature. The fix is a shallower feature, a hotter release or a different material, in that order of cost.
A tear at one point means a local problem: a sharp corner, a thin spot from uneven draw, or a cold patch where the heater zone is weak. It is usually cheaper to fix than a general tear, and it is often misdiagnosed as one because the operator sees a tear and reaches for the temperature setting.
A lip that releases but does not hold means the feature is too shallow after spring back. The tool needs to be cut deeper, or the design needs a positive snap rather than a friction fit. A friction undercut that just clears will loosen after a few assembly cycles.
| Symptom | Causa | First fix |
|---|---|---|
| Tear along the whole lip | Depth beyond the material | Reduce depth or raise release temperature |
| Tear at one point | Sharp corner or thin spot | Add radius, balance the draw |
| Lip releases but will not hold | Spring back, feature too shallow | Cut the tool deeper |
| Cracks after a day | Strain near the limit | Reduce depth, increase radius |
| White stress marks | Cold release | Longer cooling or hotter sheet |
Table 2 — Reading the failure to find the cause
The white stress mark deserves a mention because it is the earliest warning. A lip that turns white at the fold is being strained close to its limit even if it has not torn yet, and it will crack in service. Treat the mark as a failure, not as a cosmetic issue.
Can thermoforming make an undercut at all?
Yes, up to about 6 mm in PP or HDPE with 5 degrees of draft, and less in stiffer materials. The part flexes over the feature and springs back. Beyond that the material tears and a split tool or a post forming step is needed.
How much draft does an undercut need?
More than a plain wall. About 4 degrees for a 2 mm undercut, 7 degrees for 5 mm and 9 degrees for 8 mm to reach a 95 percent release rate. The draft is on the undercut face itself.
Why does my part tear at one point only?
A local cause: a sharp internal corner, a thin spot from uneven draw, or a cold patch under a weak heater zone. Check the corner radius first, because it is the most common and the cheapest to fix.
Is a split tool worth it for an undercut?
Only at volume. A split tool costs two to three times a one piece aluminium tool and needs a machine that can actuate it. Below a few thousand parts a year, post forming the undercut is cheaper and more reliable.
What is the difference between an undercut and a snap fit?
A snap fit is an undercut designed to hold a second part. The forming problem is identical, but a snap fit needs a sharper retention face and a shallower lead-in, which makes the release harder. Design the lead-in first and the retention second.
Does the material colour affect undercut forming?
Not the colour, but the pigment loading does. A heavily filled or heavily pigmented sheet is stiffer and tears sooner. On a colour critical part with an undercut, test the actual compound rather than a natural grade.
Need an undercut in a formed part?
Send the drawing and the material. We will tell you whether it will release, what draft it needs, and whether a split tool or a post forming step is the cheaper route.




 IT
 EN
 ES
 FR
 DE
 PT
 AR
 RU
 JA
 KO
 NL
 TR
 PL
 ID
