
The shape of the drift names the cause
A dimension that is out of tolerance from the first metre is a tooling or setup problem, and it is easy to diagnose because it is there immediately. A dimension that is correct for six hours and then walks is a different class of problem, and the shape of the curve over time is the most useful diagnostic available.
The chart on the left is a real pattern from a profile line: deviation sits at 0.02 to 0.03 mm for the first five hours, steps to 0.05 at hour six, and then climbs to 0.09, 0.14, 0.19 and 0.24 over the following four hours. The limit is 0.15 mm, which is crossed between hour eight and hour nine.
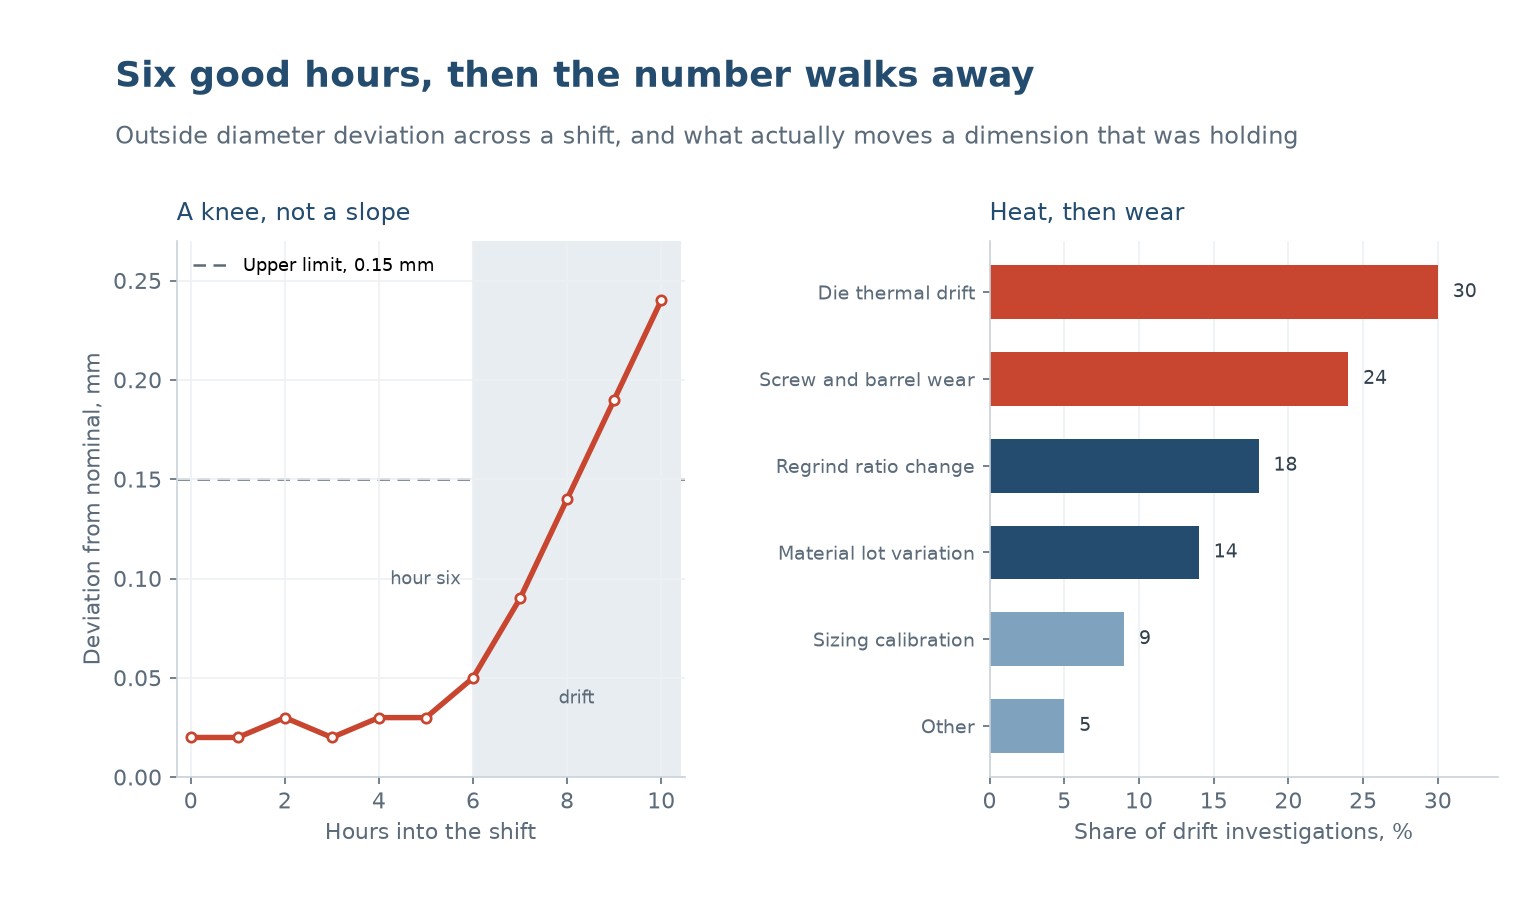
Three shapes cover almost every case. A slow linear climb from the start is thermal: something is heating up and has not reached equilibrium. A step change at a particular time is an event: a new lot of material, a change of shift, a regrind bin that ran out. A climb that accelerates is wear, because wear and the resulting flow change are not linear.
The pattern in the chart is a step followed by an accelerating climb, which is two causes stacked. That is common: an event exposes a condition that was already marginal, and the two together produce a curve that no single explanation fits.
Thermal drift is the one that takes hours
Thermal drift accounts for 30 percent of drift investigations and it is the one that produces a clean linear climb. The die, the barrel and the calibration tank all reach equilibrium slowly, and a line started from cold will still be moving dimensions two to three hours later even with every controller showing the setpoint.
The mechanism is straightforward: polymer viscosity depends on temperature, viscosity determines the pressure drop through the die, and pressure drop determines output. A die that is two degrees warmer than it was at start-up passes slightly more material, and the profile comes out slightly larger. On a tight tolerance the difference is enough.
The controllers do not catch it because they are controlling the heater, not the die. A die with 15 kg of steel in it takes hours to reach thermal equilibrium even when the thermocouple in the heater band is on setpoint. The measurement that matters is the die body temperature, taken with a contact probe at several points, not the controller display.
The fix is a soak. Bring the line to temperature and let it stand for an hour before the first production length, or run scrap until the die body temperature has stopped moving. A shop that starts producing at the moment the controller reaches setpoint will spend the first three hours chasing a dimension that is chasing the die.
| What to record | How often | Why it earns its place |
|---|---|---|
| Critical dimension | Every hour, on a marked length | Gives the curve its shape |
| Velocità della vite | Every hour | Reveals wear when it creeps up |
| Die body temperature | At start-up and every two hours | Shows when the die is in equilibrium |
| Regrind ratio | Every shift, from the dosing unit | Catches the step before the dimension does |
| Material lot | At every change | Explains a step with no other cause |
| Water temperature | Every shift, handheld | Catches a controller reading wrong |
Table 2 — A shift log that is worth keeping, and what each line is for.
Wear accumulates and shows up as a step
Screw and barrel wear accounts for 24 percent and it behaves differently. Wear reduces the metering efficiency of the screw, which reduces output at a given screw speed, which the operator compensates for by raising screw speed. The compensation works until it does not, and the point where it stops working appears as a step.
The classic sign is a line that needs a higher screw speed than it did a year ago to make the same output. If the process sheet says 62 rpm and the line only holds size at 71, the screw has lost metering efficiency and the difference is wear, not a change in material.
Wear is measurable without stripping the machine. Pull the screw, measure the flight diameter at the feed, compression and metering sections, and compare against the original drawing. A metering section that has lost 0.5 mm of flight diameter is worn enough to explain a persistent output shortfall.
The consequence for dimensional drift is that the line becomes sensitive to things it used to absorb. A worn screw has less reserve, so a small change in material bulk density or in regrind ratio produces a larger change in output than it would on a healthy machine, and the drift becomes more frequent.
Regrind ratio steps, it does not creep
Regrind ratio at 18 percent is the cause that produces a step rather than a slope, and it is the easiest to overlook because nothing on the machine changes. A bin runs out, an operator tops up with virgin, and the ratio moves from 20 percent to 5 percent in a single action.
The effect on dimensions is real and directional. Regrind has a slightly lower bulk density and a slightly different melt viscosity, and it shrinks differently on cooling. A profile running at 20 percent regrind and one running at 5 percent will not hold the same dimension, even with the same screw speed and the same temperatures.
The control is a gravimetric or volumetric dosing unit with a recorded ratio, not a bucket and a scoop. Where dosing is manual, the ratio should be written on the process sheet and the sheet should be checked at the start of each shift, because the failure mode is a well-intentioned operator topping up a bin.
| Shape of the drift | Likely cause | First check |
|---|---|---|
| Linear climb from start-up | Thermal, die not in equilibrium | Die body temperature against start-up |
| Step at a shift change | Regrind ratio or material lot | Dosing record, lot numbers |
| Accelerating climb | Screw or barrel wear | Screw speed needed against process sheet |
| Step then climb | An event exposing a marginal condition | Both of the above |
| Drift that reverses overnight | Ambient temperature or water temperature | Chiller setpoint and shop temperature |
Table 1 — Reading the shape of a drift to find its cause.
Material lot and calibration drift
Material lot variation at 14 percent is the smallest of the process causes and the one most often blamed first. Compound from different lots varies in bulk density, in lubricant level and in filler dispersion, and a profile that is on the edge of tolerance can move outside it on a lot change with no other alteration.
The test is a lot comparison: record the dimension on the last length of the old lot and the first length of the new one, with everything else unchanged. A step at the lot boundary is the material; a gradual change across both lots is something else.
Sizing calibration at 9 percent is the slowest of all and the least visible. A sizing sleeve wears, the vacuum slots scale up, a water temperature controller reads two degrees off. None of these produces a step, and all of them produce a drift that is only visible against a record.
Which is why the most valuable tool in a drift investigation is not a gauge but a log. A shop that records the dimension, the screw speed, the die temperature and the regrind ratio once an hour has a dataset that identifies the cause in an afternoon. A shop that records nothing has an argument.
Containing a drift while you find it
While the cause is being found, the line still has to ship. The containment that works is a shortened inspection interval rather than a widened tolerance: measure every length instead of every tenth, and hold the ones that are outside rather than scrapping them, because a dimension that drifts can often be brought back and the held stock can be sorted later.
The second containment is to freeze the variables that are under control. No lot changes, no regrind ratio changes, no speed changes, and the same operator on the same shift. A drift investigation conducted while the process is being adjusted for other reasons produces data that cannot be interpreted.
The third is to write down the time of every change as it happens, not afterwards. The step in the chart was at hour six, and the question that resolves it is what happened at hour six. Without a timestamp the answer is a recollection, and recollections are unreliable at the end of a shift.
Once the cause is found, the record should go into the process sheet as a control: a soak time, a dosing ratio, a screw speed limit, a sleeve inspection interval. A drift that has been diagnosed once and not written down will be diagnosed again by somebody else next year.
Why does an extruded profile hold size for hours and then drift?
Because the cause builds slowly. Thermal drift from a die that has not reached equilibrium, wear in the screw and wear in the sizing sleeve all change the process gradually, and the dimension follows them once the reserve in the tolerance is used up.
How can I tell thermal drift from screw wear?
By the shape. Thermal drift is a slow linear climb from start-up; wear is an accelerating climb, and it shows as a line that needs a higher screw speed than the process sheet states to hold the same output.
Why does the dimension step at a shift change?
Almost always the regrind ratio. A bin runs out and is topped up with virgin, so the ratio moves from say 20 percent to 5 percent in one action. Regrind shrinks differently, so the dimension steps with it.
How long should a line soak before production?
Until the die body temperature has stopped moving, which is typically one to two hours on a die with significant steel mass. The controller reaching setpoint is not the same thing as the die being in equilibrium.
What is the quickest way to investigate a drift?
Record the dimension, screw speed, die temperature and regrind ratio once an hour, and log the time of every change. The step in the data points at the event, and the log says what the event was.
Can a worn screw be measured without removing it?
Not reliably. Output against screw speed gives an indication, but the measurement that settles it is the flight diameter at the feed, compression and metering sections against the original drawing, which means pulling the screw.
A line that holds its size
Send us the profile, the tolerance and the drift you are seeing. We will tell you which of the three shapes it matches, and what to check first before anyone strips a screw.




 IT
 EN
 ES
 FR
 DE
 PT
 AR
 RU
 JA
 KO
 NL
 TR
 PL
 ID
