What a leak test is actually measuring
A leak test measures the rate at which a sealed volume loses pressure. That rate depends on the size of the hole, the pressure difference across it, the volume of the container and the viscosity of the fluid passing through.
For a thermoformed container the volume is fixed by the part and the pressure difference is limited by the wall strength, so the only variables you control are the test pressure and the time. Both are usually set too low because a faster test is a cheaper test.
The result is a test that detects gross leaks and passes pinholes. A pinhole in a food tray is exactly the defect that causes a field failure, because it lets oxygen in over a shelf life of weeks.
So the first question in specifying a leak test is not what pressure to use. It is what hole size the customer needs to be protected against, and that answer comes from the shelf life requirement.
Decay curves by leak size
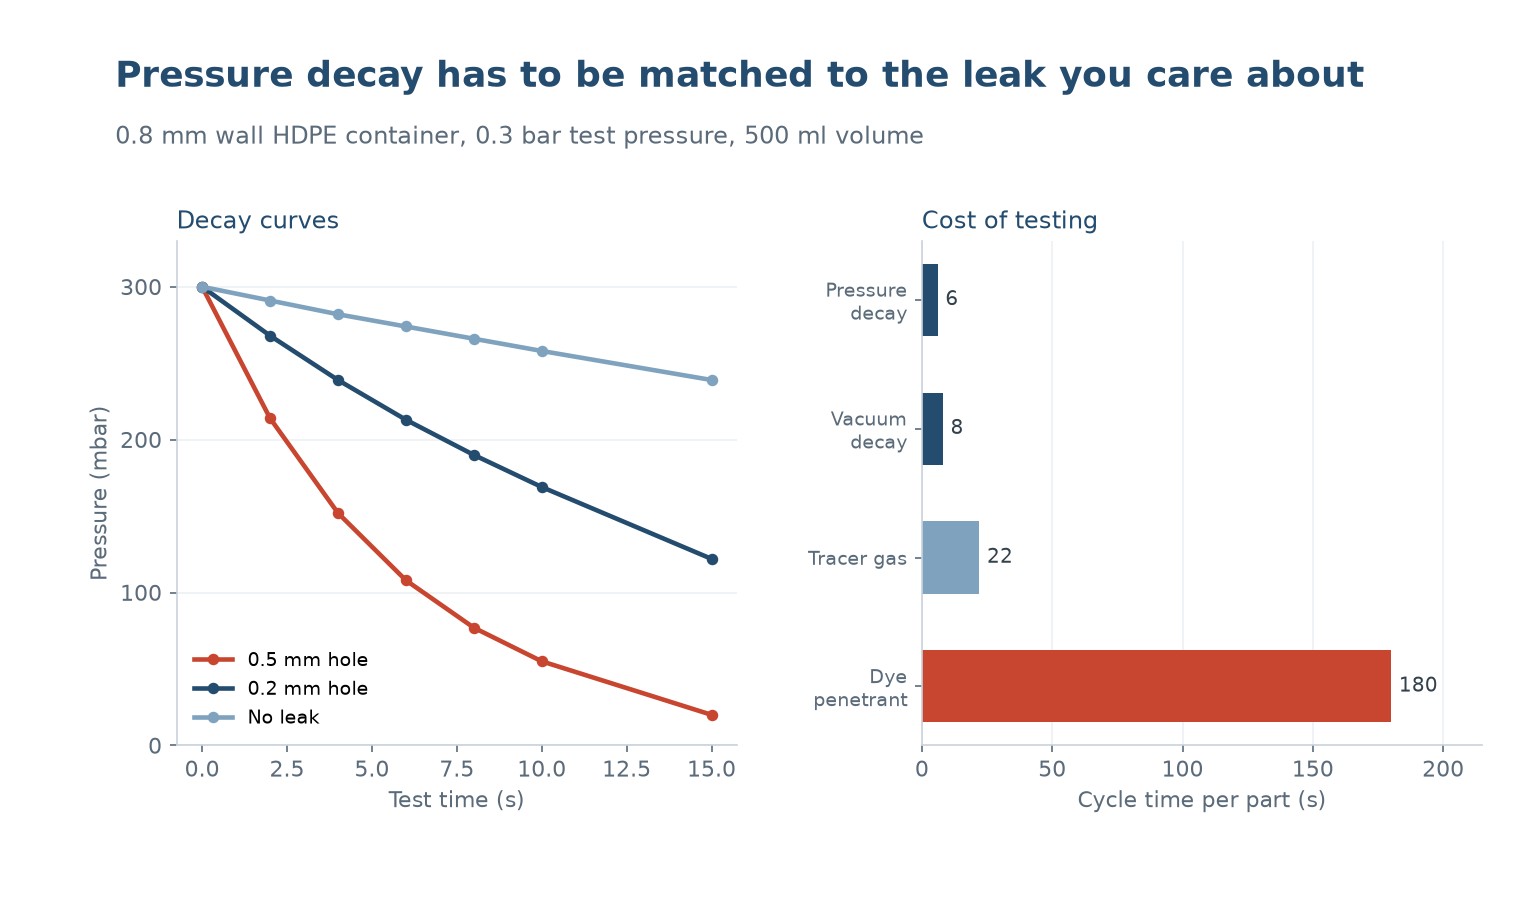
The chart on the left shows pressure decay over 15 seconds for an 0.8 mm wall HDPE container at 0.3 bar test pressure and 500 millilitres volume. A 0.5 mm hole drops from 300 to 55 millibars in ten seconds. A 0.2 mm hole drops from 300 to 169 in the same time. A sound part drops from 300 to 258.
Look at the first six seconds, which is where most production tests end. The 0.5 mm hole has fallen to 108, the 0.2 mm hole to 213 and the sound part to 274. All three are distinguishable, but the margin between the 0.2 mm hole and a sound part is only 61 millibars, which is inside the noise of a cheap transducer.
Extend to fifteen seconds and the separation is 239 against 122, a margin of 117 millibars. The test is slower and it is far more reliable, because the signal grows while the noise does not.
That is the trade: test time against discrimination. A six second test can only reject gross leaks; a fifteen second test can reject the pinholes that matter.
The four methods and what each costs
Pressure decay is the workhorse. It is fast, dry and cheap to run, and it needs a fixture that seals the container opening. Six seconds per part is typical and fifteen is achievable.
Vacuum decay is the same principle in the other direction and is used where the container would deform under positive pressure. Eight seconds per part is typical, and it has the same discrimination limits.
Tracer gas, usually helium, is far more sensitive and far more expensive. Twenty-two seconds per part, plus the cost of the gas and the recovery system. It is used for medical and pharmaceutical packaging where a pinhole is a sterility failure.
Dye penetration is the slowest at around 180 seconds and it is destructive. It is a laboratory method for finding where a leak is, not for production testing.
| Metodo | Tempo di ciclo | Sensibilità | Destructive |
|---|---|---|---|
| Pressure decay | 6 to 15 s | Moderato | No |
| Vacuum decay | 8 to 18 s | Moderato | No |
| Tracer gas | 22 s | Very high | No |
| Dye penetration | 180 s | Alto | Sì |
Table 1 — Test methods compared on speed and sensitivity.
Setting a decay limit
Start from a known good part and a known bad part. Run both through the same fixture at the same pressure and time, and record the decay. The limit goes between them, closer to the good part, and it is expressed as a pressure change over a defined time.
Then check the repeatability. Run thirty good parts and calculate the standard deviation of the decay. The limit should be at least three standard deviations above the mean, otherwise normal variation will reject good parts.
Then check the temperature sensitivity. Air expands with temperature, so a container tested warm will show a pressure rise rather than a decay. A test cell next to an oven will produce false rejects all afternoon, and the fix is either temperature compensation or moving the cell.
And check the fixture. A seal that leaks at the container rim looks exactly like a leak in the part. Prove the fixture with a solid blank before trusting any result.
| Parametro | Typical setting | Perché |
|---|---|---|
| Test pressure | 0.2 to 0.5 bar | Below wall deformation |
| Stabilisation time | 1 to 2 s | Let the seal settle |
| Test time | 10 to 15 s | Discriminate pinholes |
| Decay limit | 3 sigma above good mean | Avoid false rejects |
| Temperatura | Compensated or stable | Thermal expansion |
Table 2 — Parameters that decide whether the test means anything.
False rejects and false passes
A false reject is usually a fixture problem. A rim that is not flat, a seal that is worn, or a container that is not seated squarely will all show a decay on a good part.
A false pass is usually a test that is too short. The container has not finished stabilising, the leak is slow, and the reading at six seconds has not separated from the noise.
A false pass can also come from a leak path that closes under test pressure. A thin wall container can deflect and seal a pinhole against the fixture, which is why vacuum decay is sometimes preferred for thin parts.
The way to find both is to seed known defects deliberately: a part with a 0.2 mm hole, a part with a slit, a part with a sealed pinhole. Run them through the test and confirm they are caught. A test that has never been challenged is a test nobody should trust.
Designing a part that is testable
A container with a wide, flat sealing rim is easy to test. A container with a curved rim, a thin lip or a textured surface is difficult, and the fixture cost rises faster than the part cost falls.
Wall thickness uniformity matters too. A part with a thin corner will deflect under test pressure, which changes the volume and produces a decay that looks like a leak. Forming a more even wall makes the test more reliable as well as the part stronger.
The test should be designed at the same time as the part. A leak specification written after the tool is cut often cannot be met by the fixture that the budget allows, and the argument that follows is expensive.
Finally, decide what happens to a failed part. If the failure is a fixture artefact, the part is good and the fixture is not. Recording the failure mode, not just the pass or fail, is what makes the test useful over time.
How long should a pressure decay leak test run?
Ten to fifteen seconds to detect pinholes in a typical container. Six seconds only separates gross leaks, because the signal has not yet grown beyond the noise.
What test pressure should I use?
0.2 to 0.5 bar for a thin wall container, low enough that the wall does not deform and change the volume. Higher pressure improves sensitivity but distorts the part.
Why do I get false rejects on good parts?
Usually a fixture problem: a worn seal, a rim that is not flat or a container not seated squarely. Prove the fixture with a solid blank before blaming the part.
What is the difference between pressure decay and vacuum decay?
The same principle in opposite directions. Vacuum decay suits thin parts that would deform under positive pressure, and runs at similar cycle times.
When is tracer gas worth the cost?
When a pinhole is a sterility or safety failure, such as medical or pharmaceutical packaging. It is far more sensitive than pressure decay but costs more per part.
How do I set a decay limit?
Run known good and known bad parts through the same fixture, place the limit between them, and set it at least three standard deviations above the good mean to avoid false rejects.
Sealed containers failing in the field?
Send the part and the shelf life requirement. We will help you specify a leak test that catches the defect that actually matters.





 IT
 EN
 ES
 FR
 DE
 PT
 AR
 RU
 JA
 KO
 NL
 TR
 PL
 ID