

Why a vertical wall will not come out
Plastic shrinks onto a core as it cools. A wall that is parallel to the direction of opening is gripped by that shrinkage along its whole length, and the ejection system has to overcome the friction of the entire surface. Draft turns that friction into a sliding contact with a small clearance.
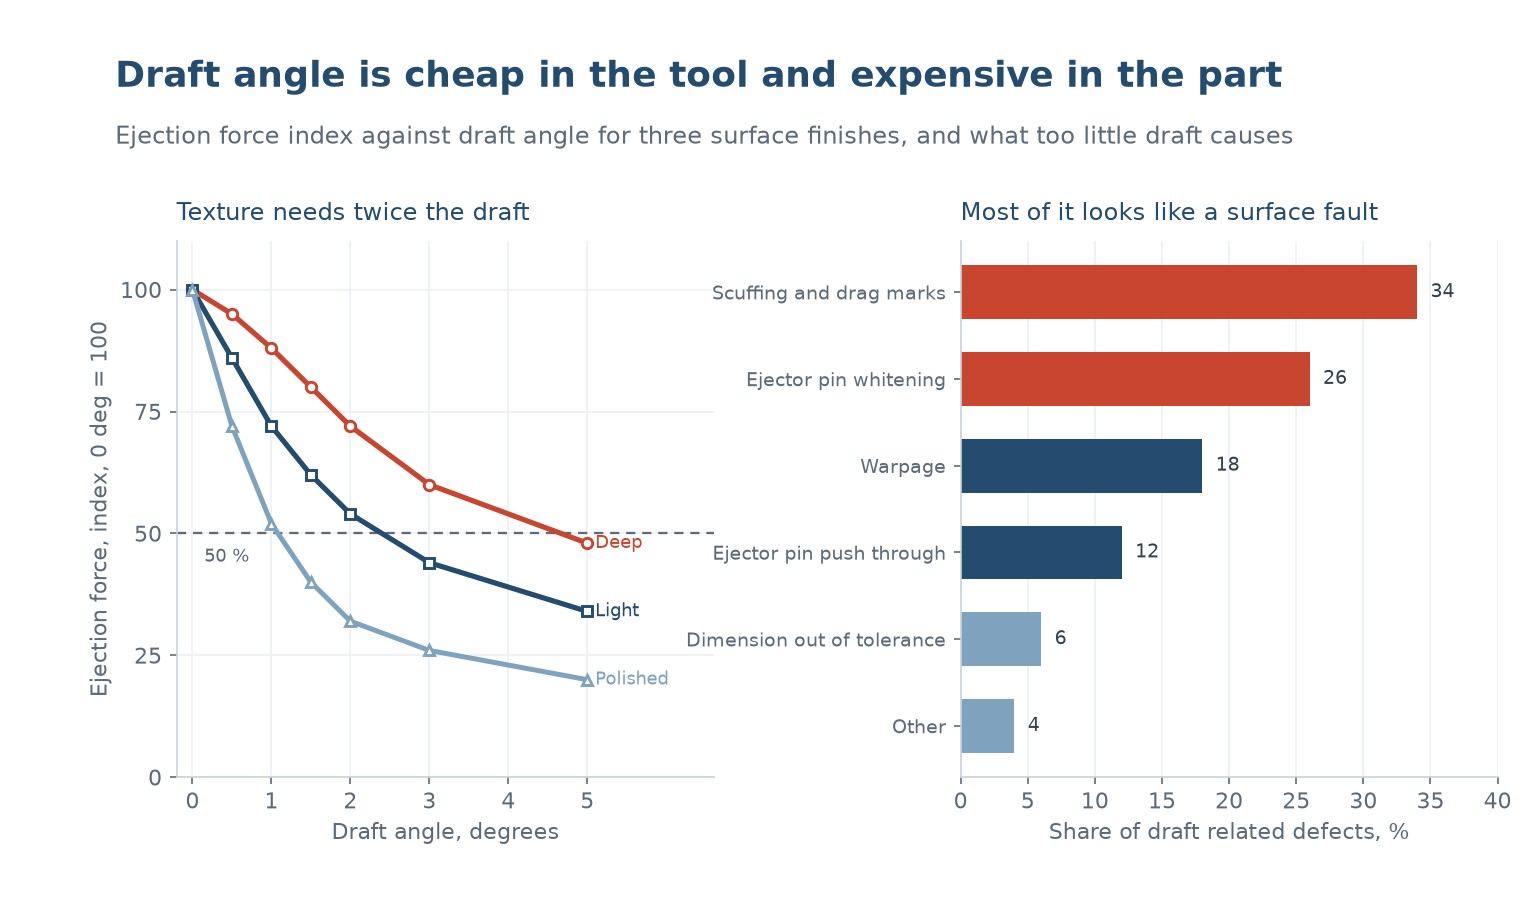
The effect is not linear. The chart on the left shows ejection force against draft angle for three surface finishes, indexed to 100 at zero draft. A polished wall falls to 52 percent of the zero draft force at 1 degree, and to 32 percent at 2. A deeply textured wall is still at 88 percent at 1 degree and only reaches 48 percent at 5.
That is why the standard recommendation of 1 to 2 degrees is right for a polished wall and wrong for a textured one. Texture adds mechanical interlock: the plastic shrinks into the valleys of the texture and has to be pulled out of them, and the deeper the texture, the more draft is needed to break that grip.
The force also depends on the depth of the wall and on the material. A deep wall has more contact area, and a material with a high shrinkage grips harder. Both increase the force at a given draft, which is why a deep textured part in a glass filled nylon needs 3 degrees where a shallow polished part in ABS needs 1.
How much draft, by surface and depth
The working rule for a polished surface is 1 degree minimum and 2 degrees for comfort, with 0.5 degrees added for every 25 mm of depth beyond the first 50. For a light texture, 2 to 3 degrees; for a deep texture, 4 to 6 degrees depending on the depth of the pattern.
The texture supplier will normally state a minimum draft for a given pattern, and that number should be taken as the floor, not the target. A pattern that specifies 3 degrees minimum will still scuff at 3 degrees on a deep wall, because the minimum is calculated for a flat plaque.
Internal surfaces need more than external ones. A core shrinks away from the plastic, but the plastic shrinks onto the core, so the grip is on the core. The rule of thumb is that internal draft should be 1 degree more than external draft for the same finish.
Ribs, bosses and slots all need their own draft. A rib with vertical sides is a wall with vertical sides, and it will drag. A boss with vertical sides will grip the core pin and may crack at ejection. These are the features that are most often drawn without draft, because they are added late in the design and nobody goes back to check.
What too little draft looks like
Scuffing and drag marks are the first sign. The wall rubs against the steel on the way out and leaves a matt, whitened streak, usually on the side where the ejection force is highest. It is a cosmetic defect that is also a warning: the same force is acting on the whole part.
Ejector pin whitening comes next. The pins push, the wall grips, and the stress concentrates at the pin. A white halo around a pin mark means the part is being deformed locally at ejection, and on a brittle material it is one step from a crack.
Then push through: the pin goes through the wall. That is the end point of the progression, and by the time it happens the draft has been inadequate for the whole life of the tool. The chart on the right puts scuffing at 34 percent and pin whitening at 26 percent of draft related defects, which is 60 percent of the problem showing up as two symptoms.
Warpage at 18 percent is the less obvious one. A part that is dragged out of the tool is stressed, and it relaxes after ejection into a warped shape. Fixing the warpage with cooling or packing will not work if the cause is ejection stress.
Adding draft without changing the design
The usual objection is that draft changes the dimension. It does, but the change can be put where it does least harm. Drafting the wall outward from a fixed point at the parting line keeps the mating dimension and adds material at the other end, which is usually invisible.
The second option is to draft only the non functional surfaces. A wall that has to be vertical for 20 mm to locate a mating part can be drafted above that band, and the locating band can be kept straight with a small relief groove.
The third is to accept a thicker wall. Draft that adds material is usually cheaper than draft that removes it, because removing material from a structural wall reduces its stiffness while adding it only adds a little weight.
What should not happen is a decision to run without draft and compensate with release agent. Release agent is a production cost, a contamination risk and a cosmetic variable, and it does not solve the underlying mechanics.
Checking draft before the tool is cut
Every CAD package can colour a model by draft angle relative to a pull direction. Running that check takes minutes and catches the features that were drawn vertical, which are almost always the ribs, bosses and slots added late.
The check should be run with the actual pull direction, including any side actions. A feature that is drafted correctly for the main pull may be vertical for a slider, and the slider will scuff even though the main wall is fine.
The check should also be run at the minimum draft, not the nominal. A wall drawn at 1.5 degrees may be 1.2 after tolerance, and 1.2 is below the limit for a textured surface. Designing to 2 degrees to get 1.5 in production is the safer habit.
| Surface | Minimum draft | Comfortable | Note |
|---|---|---|---|
| Polished | 0.5 deg | 1 to 2 deg | Add 0.5 deg per 25 mm of depth |
| Light texture | 1.5 deg | 2 to 3 deg | Ask the texture supplier |
| Deep texture | 3 deg | 4 to 6 deg | The stated minimum is for a flat plaque |
| Internal surface | 1 deg more | 2 deg more | The plastic shrinks onto the core |
| Ribs and bosses | 0.5 deg per side | 1 deg per side | Most often drawn vertical |
Table 1 — Draft by surface, as a starting point
The economics of half a degree
Adding draft to a drawing costs nothing. Adding it to a tool after the tool has been cut costs a weld and a re-cut, or a new insert, and the lead time is measured in weeks. That asymmetry is the whole argument.
The production cost of inadequate draft is harder to see but larger. A part that scuffs has a higher reject rate, a part that needs release agent has a slower cycle, and a part that is ejected under stress has a hidden warpage that appears after assembly.
The practical approach is to specify draft in the design review, check it in the CAD, and check it again on the first article by looking at the ejection marks. If the part comes out with a shine on the wall where the drawing called for a matte finish, the draft is marginal and it will get worse as the tool wears.
| Symptom | Cause | Fix |
|---|---|---|
| Matt streak on a side wall | Draft below 1 deg | Add draft, polish the wall |
| White halo round a pin | Ejection stress | More draft, more pins |
| Crack at a boss | Boss drawn vertical | Add 0.5 deg per side |
| Part warps after ejection | Dragged out of the tool | More draft before changing cooling |
| Needs release agent | Draft or polish | Fix the steel, not the process |
Table 2 — Reading the ejection marks
The last row is the one to act on. A tool that needs release agent on every shot has a draft or polish problem, and the agent is masking it while adding cost, contamination and a surface that will not take a bond.
How much draft does a moulded part need?
One to two degrees on a polished surface, two to three on a light texture and four to six on a deep texture, with another degree on internal surfaces. Add half a degree for every 25 mm of depth beyond 50 mm.
Why does texture need more draft?
Because the plastic shrinks into the valleys of the texture and has to be pulled out of them. The interlock adds force that draft has to break, and the deeper the pattern the more draft is needed.
Can I run a vertical wall with release agent?
You can, and you will pay for it on every shot in agent, contamination, cycle time and cosmetic variation. A tool that needs release agent has a draft or polish problem that belongs in the steel.
Does draft change the part dimension?
It does, but the change can be placed where it does not matter. Draft outward from a fixed point at the parting line, or keep a short locating band straight and draft above it.
Which features are usually drawn without draft?
Ribs, bosses and slots, because they are added late in the design and nobody goes back to check. They are also the features where a lack of draft causes cracks rather than scuffs.
How do I check draft before cutting the tool?
Colour the CAD model by draft angle against the actual pull direction, including side actions, and check at the minimum draft rather than the nominal. It takes minutes and it is the cheapest check in the project.
Tool scuffing or sticking?
Send the part drawing and the surface specification. We will check the draft, tell you which features are marginal, and what it takes to correct them.




 EN
 ES
 FR
 DE
 PT
 AR
 RU
 JA
 KO
 IT
 NL
 TR
 PL
 ID
