Where the charge comes from
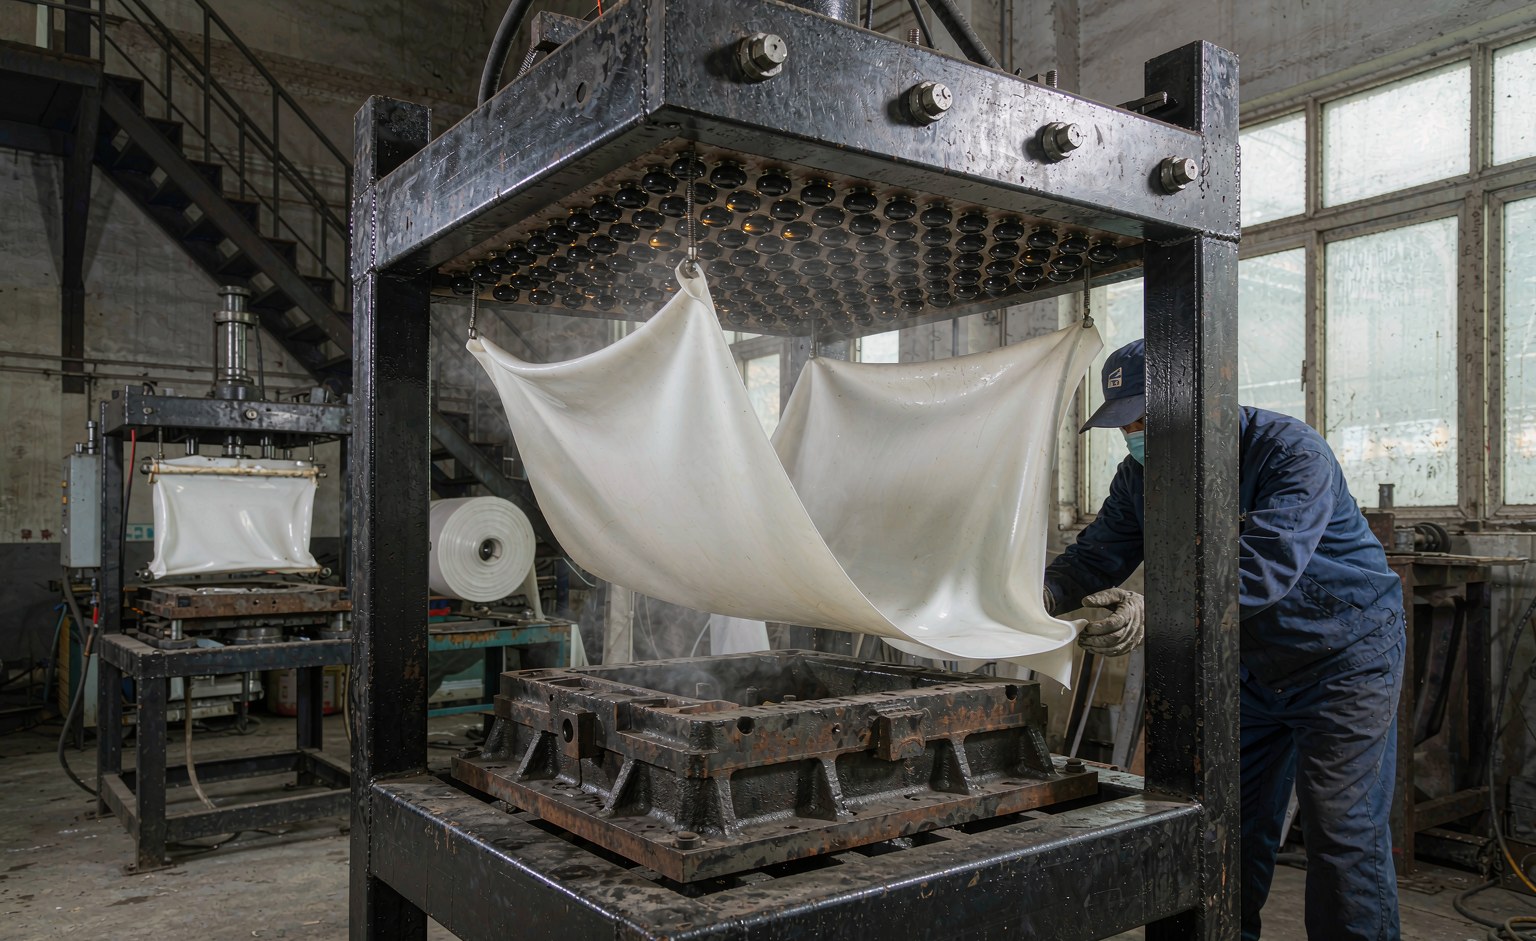
Static on a forming line is generated by contact and separation, not by the heater. Every time two surfaces touch and pull apart, electrons transfer. On a thin gauge line that happens when sheets are separated from a stack, when film unwinds from a roll, when the sheet slides over transport rails and belts, when a formed tray is lifted off the mould, and when trim scrap is pulled away.
The oven then makes it worse indirectly. PET and PP are good insulators with surface resistivity in the region of 10^14 to 10^16 ohms per square. Moisture on the surface provides a weak conductive path, and heating drives that moisture off. A sheet that would bleed a charge away in seconds at room humidity can hold it for minutes at forming temperature.
This is why a line that runs cleanly in the morning can start producing dusty trays after an hour. The equipment has not changed; the sheet has become drier and the charge decay time has stretched.
Grounding the clamp frame and the machine chassis is necessary for operator safety and for protecting the controls, but it does almost nothing to the sheet itself. An insulator cannot drain through a point contact with a grounded rail, and the charge in the middle of a 600 mm span is effectively isolated from the edge.
The charge is also not uniform. Peeling a formed part off a textured mould leaves a patchy pattern that follows the texture, which is why dust often appears in a repeatable shape on a specific area of the tray rather than scattered at random.
Why thin gauge is the hard case
The electrostatic force on a charged sheet is roughly independent of its thickness, while the weight that has to overcome it scales with thickness. On a 0.3 mm PET sheet the two are close enough that the sheet hangs, clings and lifts where it should fall freely. On 4 mm ABS the same charge is a nuisance rather than a force.
Thin gauge lines also run fast, often 10 to 30 cycles per minute, so there are far more contact and separation events per hour. Each one adds charge, and the sheet reaches the forming station with a higher starting potential than a slow thick gauge job would.
Deep thin wall draws need the sheet to slide slightly in the clamp frame as it forms. A charged sheet sticks to the frame and to the mould surface unevenly, so the draw becomes asymmetric. That shows up as local thinning, webbing in the corners, and a wall thickness distribution that shifts across the run.
The product requirements make the consequences worse. Thin gauge PET and PP is overwhelmingly used for blisters, trays and inserts where the surface is visible and often printed or sealed. A single fibre on the sealing flange is a leak path, and a speck under a clear lid is a customer reject rather than a cosmetic note.
There is a safety dimension too. A discharge near solvent based inks, adhesives or fine powder in a downstream station is an ignition source worth designing out, and repeated shocks to operators near exposed control wiring are a real equipment reliability issue.
What static actually costs
The most obvious loss is dust attraction. A charged sheet pulls in fibres, cardboard dust and skin flakes from the whole forming cell, and those particles are then locked onto the surface by the heat of forming. Washing after the fact does not remove a particle that has been pressed into soft PET.
Sheet cling is the second loss. Two sheets feed together, a tray hangs in the mould instead of ejecting, or trim scrap wraps round a roller. Each event stops the line, and on a 25 cycle per minute machine a two minute clear-out costs fifty parts plus the restart scrap.
Web wander and trim registration are the third. A sheet that is being pulled sideways by an uneven charge does not sit square in the trim tool, so cut edges drift and the printed graphics no longer line up. Operators often chase this with clamp pressure and make the draw worse.
And there is the slow loss of yield that nobody attributes to static: a gradual rise in the reject rate over a shift as the plant warms up and relative humidity falls. It looks like a material or tooling problem until someone puts a field meter on the sheet.
| Symptom | Where it shows | Typical charge at the sheet |
|---|---|---|
| Dust specks on formed trays | Forming station and stack | 3 to 12 kV |
| Double picks and sheet cling | Feed and de-stack | 5 to 15 kV |
| Uneven draw, corner webbing | Clamp frame and mould | 2 to 8 kV |
| Trim registration drift | Trim press | 2 to 6 kV |
Table 1 - Static symptoms and the charge levels that usually produce them.
Measuring it properly
Use a non-contact electrostatic field meter, and use it at a fixed distance. Most instruments are calibrated for a specific stand-off, commonly 25 mm or 100 mm, and the reading in kilovolts is meaningless without that distance. Write the distance on the inspection sheet.
Take readings at four fixed points: immediately after the oven, above the mould before the tool closes, after the trim press, and at the stacker. The profile tells you where charge is being generated and where control has to go. A high reading at the oven and a low one at the stacker means the process is generating charge early and something downstream is already bleeding it off.
For ioniser acceptance, measure charge decay rather than absolute field. A charge plate is charged to a defined level, typically 5 kV, and the time to decay to 10 percent or to 1 kV is recorded. That is the number ioniser suppliers quote, and it is the only fair way to compare two bars.
Log relative humidity and sheet surface temperature with every reading. A 4 kV reading at 25 percent RH and a 4 kV reading at 60 percent RH imply very different control strategies, because the first will not improve on its own.
A workable production target is below 1 to 2 kV at the mould and a decay time under two seconds with the ioniser running. Keep away from grounded rails and metal edges when measuring, because they distort the field and give an artificially low reading.
Record the reading at start-up, after every roll or blade change, and at the end of the shift. A rising trend is a dirty emitter tip or a failing high voltage supply long before it becomes a visible dust problem.
Ionisation hardware and where to put it
An ionising bar creates both positive and negative air ions around its emitter pins. A charged sheet attracts the opposite polarity and neutralises itself, without any electrical contact. That is the key advantage over grounding: it works on an insulator.
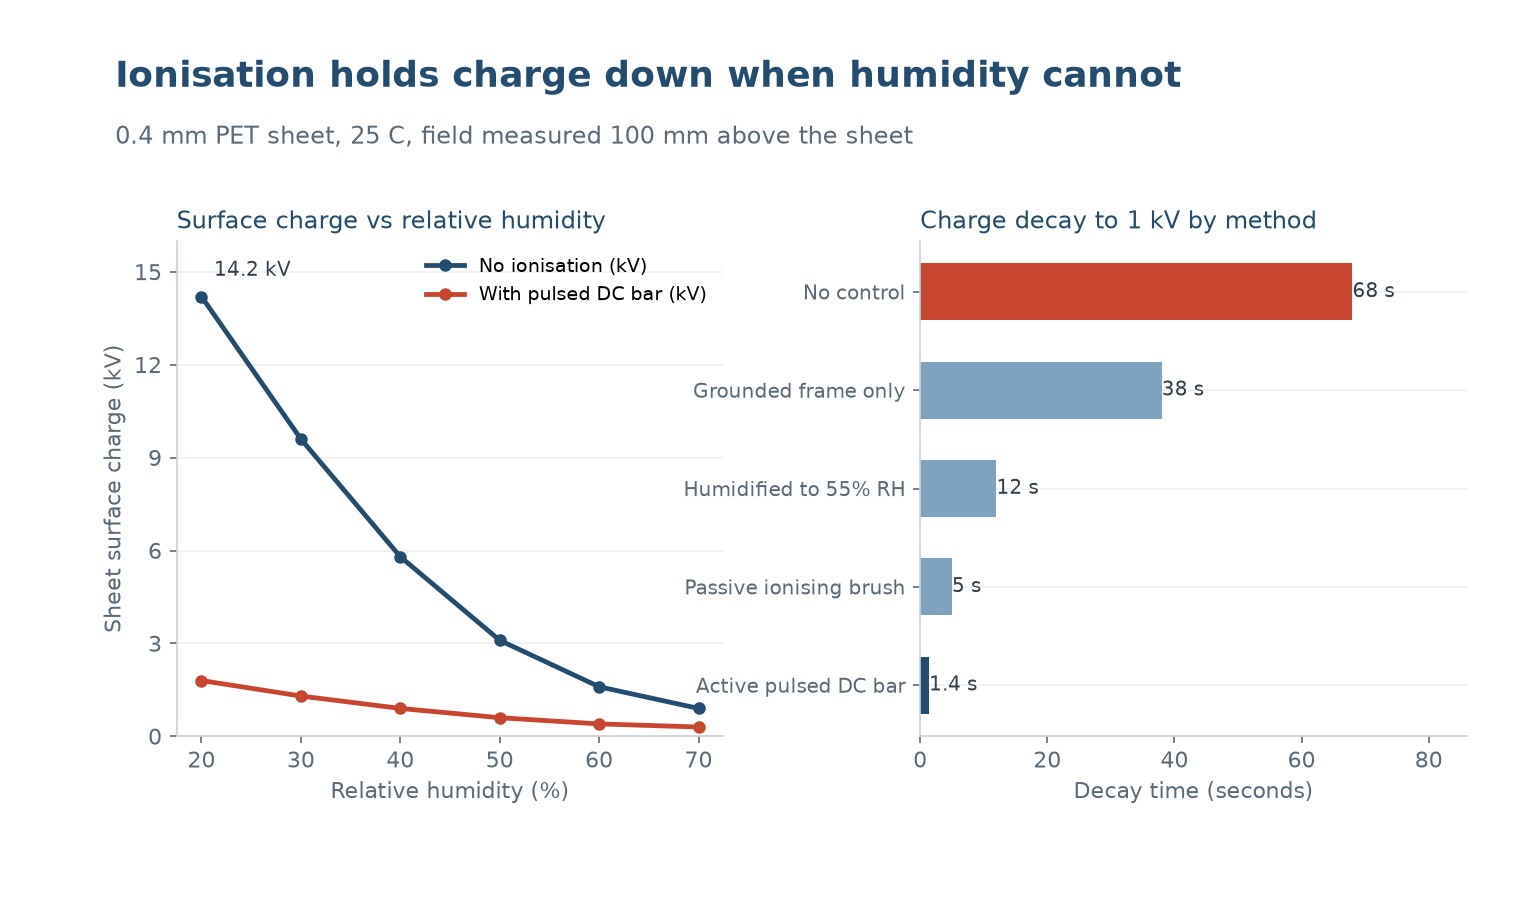
AC bars are simple, self balancing and cheap, and suit short stand-off distances of 25 to 75 mm. Pulsed DC bars give longer reach and better performance on wide webs and fast lines, at the cost of needing periodic ion balance adjustment.
Ionising air knives and blowers carry the ions further and into recesses. They are the right choice above a deep cavity mould, inside a stacker, or anywhere the sheet surface is more than 150 mm from a fixed bar. Compressed air must be clean and dry or the nozzle simply sprays particles onto the part.
Placement matters more than power. Put the bar before the point where the charge causes harm, not after it: before the mould closes to protect the forming surface, before the stacker to protect the finished part, and immediately before any printing or sealing station. Typical stand-off is 25 to 100 mm with the bar perpendicular to the direction of travel and spanning the full sheet width plus 50 mm either side.
Emitter pins collect dust and their output falls steadily. Wipe them weekly with the supplier's brush or a lint free swab, and verify decay time monthly with a charge plate. A bar that is switched on and glowing is not necessarily producing balanced ionisation.
| Control option | Typical decay to 1 kV | Works at 25% RH | Anmerkungen |
|---|---|---|---|
| No control | Over 60 s | Nein | Baseline in a dry plant |
| Grounded frame and tinsel | 30 to 45 s | Nein | Cheap, only helps at the edge |
| Humidified to 55% RH | 8 to 15 s | Yes, by definition | Conflicts with PET drying |
| Passive ionising brush | 3 to 6 s | Partly | Needs the sheet to pass close |
| Active pulsed DC bar | 0.8 to 2 s | Ja | Needs cleaning and balance checks |
Table 2 - Static control options and what each one buys.
Humidity, grounding and the rest of the plan
Raising the plant to 50 to 60 percent relative humidity genuinely reduces charge, but it is a poor primary control on a thermoforming line. PET sheet often has to be dried before forming, chilled moulds can condense water at high humidity, and a humid plant is uncomfortable and corrosive to tooling. Use humidity as a background condition, not as the fix.
Internal antistatic additives are a legitimate option for PP and some PET sheet. They migrate to the surface and lower its resistivity, but they need 24 to 72 hours to bloom after extrusion, they add cost, and they can interfere with food contact approvals, printing, heat sealing and optical clarity. They also do nothing for the charge generated at the mould during demoulding.
Do the cheap mechanical work anyway: bond the machine frame properly, use conductive or antistatic transport belts, fit ionising tinsel across the web at low cost points, and keep cardboard and foam packaging out of the forming cell. These steps reduce the baseline load on the active ionisers.
For medical or electronics trays, localised laminar flow over the forming station plus ionisation at the stacker is often the only way to hit a particle specification. A whole-room cleanroom classification is rarely necessary; a clean cell around the tool and the stack is what counts.
Write the control into the start-up checklist. Ioniser power on, field meter reading at the mould below the target at the specified stand-off, and a monthly decay test with the result logged. Static control that is not measured drifts out of specification without anyone noticing.
Finally, treat a dust complaint as a measurement question first. Knowing the charge at four points on the line takes ten minutes and tells you whether to add a bar, move a bar, clean a bar or change the sheet. Guessing usually ends with a new tool polish that was never needed.
What causes static on a thermoforming line?
Contact and separation of insulating sheet. De-stacking, unwind, sliding over transport rails, demoulding a formed part and pulling trim scrap all transfer charge. Heating then removes surface moisture, so the charge decays far more slowly than it would at room temperature.
Does raising the humidity solve it?
It helps, but it is a poor primary control. Fifty to sixty percent RH cuts charge noticeably, yet it conflicts with PET drying, can condense on chilled moulds, and does nothing for charge generated at demoulding. Use it as a background condition alongside active ionisation.
Where should ionising bars be installed?
Before the point where the charge causes harm: ahead of the closed mould to protect the forming surface, before the stacker for the finished part, and immediately before printing or sealing. Use a 25 to 100 mm stand-off and span the full sheet width plus 50 mm on each side.
How do I know if an ioniser is working?
Use a charge plate decay test rather than an absolute field reading. Charge to 5 kV and time the decay to 1 kV; a healthy active bar on a thin gauge line should be under two seconds. Also check ion balance, because an unbalanced bar can leave a net charge.
Will antistatic additive in the sheet replace ionisation?
Usually not. Migrating additives need one to three days to bloom, can affect sealing, printing and food contact compliance, and do not address charge generated during demoulding. They are a useful complement on long-run PP work, not a substitute for a bar at the forming station.
What charge level is acceptable at the mould?
A practical target for thin PET and PP is below 1 to 2 kV measured at a fixed stand-off, with decay to 1 kV in under two seconds. Always record the measurement distance and the relative humidity with the reading, or the number cannot be compared later.
Dust on formed trays or sheet clinging in the frame?
Tell us the gauge, the resin, the line speed and where in the cycle the dust appears. We will suggest an ionisation layout and a measurement routine your team can run in-house.







 DE
 EN
 ES
 FR
 PT
 AR
 RU
 JA
 KO
 IT
 NL
 TR
 PL
 ID